OrientDB Tutorial
OrientDB is an Open Source NoSQL Database Management System. NoSQL Database provides a mechanism for storing and retrieving NO-relation or NON-relational data that refers to data other than tabular data such as document data or graph data. NoSQL databases are increasingly used in Big Data and real-time web applications. NoSQL systems are also sometimes called “Not Only SQL” to emphasize that they may support SQL-like query languages.
OrientDB also belongs to the NoSQL family. OrientDB is a second generation Distributed Graph Database with the flexibility of Documents in one product with an open source of Apache 2 license. There were several NoSQL databases in the market before OrientDB, one of them being MongoDB.
MongoDB vs OrientDB
MongoDB and OrientDB contains many common features but the engines are fundamentally different. MongoDB is pure Document database and OrientDB is a hybrid Document with graph engine.
| Features | MongoDB | OrientDB |
|---|---|---|
| Relationships | Uses the RDBMS JOINS to create relationship between entities. It has high runtime cost and does not scale when database scale increases. | Embeds and connects documents like relational database. It uses direct, super-fast links taken from graph database world. |
| Fetch Plan | Costly JOIN operations. | Easily returns complete graph with interconnected documents. |
| Transactions | Doesn’t support ACID transactions, but it supports atomic operations. | Supports ACID transactions as well as atomic operations. |
| Query language | Has its own language based on JSON. | Query language is built on SQL. |
| Indexes | Uses the B-Tree algorithm for all indexes. | Supports three different indexing algorithms so that the user can achieve best performance. |
| Storage engine | Uses memory mapping technique. | Uses the storage engine name LOCAL and PLOCAL. |
OrientDB is the first Multi-Model open source NoSQL DBMS that brings together the power of graphs and flexibility of documents into a scalable high-performance operational database.
OrientDB – Installation
OrientDB installation file is available in two editions −
-
Community Edition − OrientDB community edition is released by Apache under 0.2 license as an open source
-
Enterprise Edition − OrientDB enterprise edition is released as a proprietary software, which is built on community edition. It serves as an extension of the community edition.
This chapter explains the installation procedure of OrientDB community edition because it is open source.
Prerequisites
Both community and Enterprise editions can run on any Operating system that implements the Java Virtual Machine (JVM). OrientDB requires Java with 1.7 or later version.
Use the following steps to download and install OrientDB into your system.
Step 1 − Download OrientDB Binary Setup File
OrientDB comes with built-in setup file to install the database on your system. It provides different pre-compiled binary packages (tarred or zipped packages) for different operating systems. You can download OrientDB files from Download OrientDB link.
The following screenshot shows the download page of OrientDB. You can download the zipped or tarred file by clicking the suitable operating system icon.
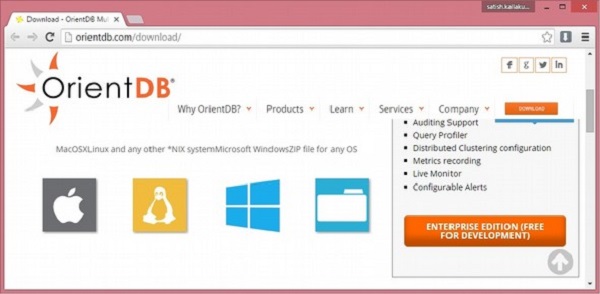
On downloading, you will get the binary package in your Downloads folder.
Step 2 − Extract and Install OrientDB
Following is the procedure to extract and install OrientDB for different operating systems.
In Linux
After download you will get orientdb-community-2.1.9.tar.gz file in your Downloads folder. You can use the following command to extract the tarred file.
$ tar –zxvf orientdb-community-2.1.9.tar.gz
You can use the following command to move all the OrientDB library files from orientdbcommunity-2.1.9 to /opt/orientdb/ directory. Here we are using super user command (sudo) therefore you have to provide super user password to execute the following command.
$ sudo mv orientdb-community-2.1.9 /opt/orientdb
You can use the following commands to register the orientdb command and the Orient server.
$ export ORIENTDB_HoME = /opt/orientdb
$ export PATH = $PATH:$ORIENTDB_HOME/bin
In Windows
-
After download you will get orientdb-community-2.1.9.zip file in your Downloads folder. Extract the zip file using the zip extractor.
-
Move the extracted folder into the C: directory.
-
Create two environmental variables ORIENTDB_HOME and PATH variables with following given values.
ORIENT_HOME = C:orientdb-community-2.1.9
PATH = C:orientdb-community-2.1.9in
Step 3 − Configuring OrientDB Server as a Service
By following the above steps you can use the Desktop version of OrientDB. You can start OrientDB database server as a service by using the following steps. The procedure is different, depending on your operating system.
In Linux
OrientDB provides a script file named orientdb.sh to run the database as a daemon. You can find it in the bin/directory of your OrientDB installation directory that is $ORIENTDB_HOME/bin/orientdb.sh.
Before running the script file, you have to edit orientdb.sh file for defining two variables. One is ORIENTDB_DIR which defines the path to the installation directory (/opt/orientdb) and the second is ORIENTDB_USER which defines the username you want run OrientDB for as follows.
ORIENTDB_DIR = "/opt/orientdb"
ORIENTDB_USER = "<username you want to run OrientDB>"
Use the following command to copy orientdb.sh file into /etc/init.d/ directory for initializing and running the script. Here we are using super user command (sudo) therefore you have to provide super user password to execute the following command.
$ sudo cp $ORIENTDB_HOME/bin/orientdb.sh /etc/init.d/orientdb
Use the following command to copy the console.sh file from OrientDB installation directory that is $ORIENTDB_HOME/bin to the system bin directory that is /usr/bin for accessing the Orient DB’s console.
$ sudo cp $ ORIENTDB_HOME/bin/console.sh /usr/bin/orientdb
Use the following command to start the ORIENTDB database server as service. Here you have to provide the respective user’s password which you mention in the orientdb.sh file to start the server.
$ service orientdb start
Use the following command to know on which PID the OrientDB server daemon is running.
$ service orientdb status
Use the following command to stop the OrientDB server daemon. Here you have to provide the respective user’s password, which you mention in the orientdb.sh file to stop the server.
$ service orientdb stop
In Windows
OrientDB is a server application therefore it has to perform several tasks before starting shutting down the Java virtual machine process. If you want to shutdown OrientDB server manually then you have to execute shutdown.bat file. But the server instances do not stop correctly, when the system shuts down suddenly without executing the above script. The programs which are controlled by the operating system with a set of specified signals are called services in Windows.
We have to use Apache Common Daemon which allow Windows users to wrap Java applications as Windows service. Following is the procedure to download and register Apache common daemon.
-
Click the following link for Apache Common Daemons for windows.
-
Click on common-daemon-1.0.15-bin-windows to download.
-
Unzip the common-daemon-1.0.15-bin-windows directory. After extracting you will find prunsrv.exe and prunmgr.exe files inside the directory. In those −
-
prunsrv.exe file is a service application for running applications as services.
-
prunmgr.exe file is an application used for monitoring and configuring windows services.
-
-
Go to OrientDB installation folder → create a new directory and name it service.
-
Copy the prunsrv.exe and prunmgr .exe paste it into to the service directory.
-
In order to configure OrientDB as Windows service, you have to execute a short script that uses the prusrv.exe as a Windows service.
-
Before defining the Windows Services, you have to rename prunsrv and prunmgr according to the name of the service. For e.g. OrientDBGraph and OrientDBGraphw respectively. Here OrientDBGraph is the name of the service.
-
Copy the following script into the file named installService.bat and place it into %ORIENTDB_HOME%service directory.
:: OrientDB Windows Service Installation
@echo off
rem Remove surrounding quotes from the first parameter
set str=%~1
rem Check JVM DLL location parameter
if "%str%" == "" goto missingJVM
set JVM_DLL=%str%
rem Remove surrounding quotes from the second parameter
set str=%~2
rem Check OrientDB Home location parameter
if "%str%" == "" goto missingOrientDBHome
set ORIENTDB_HOME=%str%


set CONFIG_FILE=%ORIENTDB_HOME%/config/orientdb-server-config.xml
set LOG_FILE = %ORIENTDB_HOME%/config/orientdb-server-log.properties
set LOG_CONSOLE_LEVEL = info
set LOG_FILE_LEVEL = fine
set WWW_PATH = %ORIENTDB_HOME%/www
set ORIENTDB_ENCODING = UTF8
set ORIENTDB_SETTINGS = -Dprofiler.enabled = true
-Dcache.level1.enabled = false Dcache.level2.strategy = 1
set JAVA_OPTS_SCRIPT = -XX:+HeapDumpOnOutOfMemoryError


rem Install service
OrientDBGraphX.X.X.exe //IS --DisplayName="OrientDB GraphEd X.X.X" ^
--Description = "OrientDB Graph Edition, aka GraphEd, contains OrientDB server
integrated with the latest release of the TinkerPop Open Source technology
stack supporting property graph data model." ^

--StartClass = com.orientechnologies.orient.server.OServerMain
-StopClass = com.orientechnologies.orient.server.OServerShutdownMain ^

--Classpath = "%ORIENTDB_HOME%lib*" --JvmOptions
"Dfile.Encoding = %ORIENTDB_ENCODING%; Djava.util.logging.config.file = "%LOG_FILE%";
Dorientdb.config.file = "%CONFIG_FILE%"; -Dorientdb.www.path = "%WWW_PATH%";
Dlog.console.level = %LOG_CONSOLE_LEVEL%; -Dlog.file.level = %LOG_FILE_LEVEL%;
Dorientdb.build.number = "@BUILD@"; -DORIENTDB_HOME = %ORIENTDB_HOME%" ^

--StartMode = jvm --StartPath = "%ORIENTDB_HOME%in" --StopMode = jvm
-StopPath = "%ORIENTDB_HOME%in" --Jvm = "%JVM_DLL%"
-LogPath = "%ORIENTDB_HOME%log" --Startup = auto

EXIT /B

:missingJVM
echo Insert the JVM DLL location
goto printUsage

:missingOrientDBHome
echo Insert the OrientDB Home
goto printUsage

:printUsage
echo usage:
echo     installService JVM_DLL_location OrientDB_Home
EXIT /B
The script requires two parameters −
-
The location of jvm.dll, for e.g. C:ProgramFilesjavajdk1.8.0_66jreinserverjvm.dll
-
The location of OrientDB installation for e.g. C:orientdb-community-2.1.9
-
The service is installed when you execute the OrientDBGraph.exe file (Original prunsrv) and double-click on it.
-
Use the following command to install services into Windows.
> Cd %ORIENTDB_HOME%service
> installService.bat "C:Program FilesJavajdk1.8.0_66jreinserver
   jvm.dll" C:orientdb-community-2.1.9
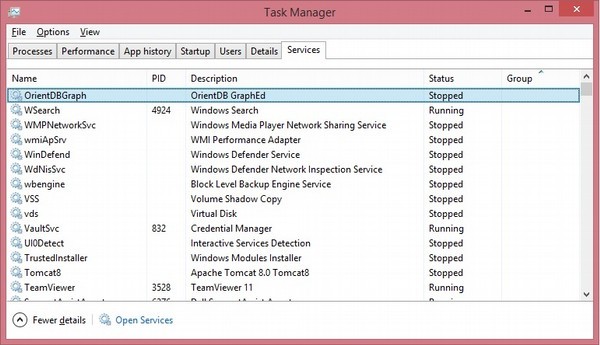
Open the Task Manager services, you will find the following screenshot with the registered service name is in it.
Step 4 − Verifying OrientDB Installation
This step verifies the OrientDB database server installation using the following steps.
- Run the server.
- Run the console.
- Run the studio.
This is unique according to the operating system.
In Linux
Follow the given procedure for verifying OrientDB installation in Linux.
Running the server − You can use the following command to start the server.
$ cd $ORIENTDB_HOME/bin
$ ./server.sh
Or you can use the following command to start the OrientDB server as UNIX daemon.
$ service orientdb start
If it is installed successfully, you will receive the following output.
          .
          .`        `
          ,      `:.
         `,`    ,:`
         .,.   :,,
         .,,  ,,,
    .    .,.:::::  ````                                 :::::::::     :::::::::
    ,`   .::,,,,::.,,,,,,`;;                      .:    ::::::::::    :::    :::
    `,.  ::,,,,,,,:.,,.`  `                       .:    :::      :::  :::     :::
     ,,:,:,,,,,,,,::.   `        `         ``     .:    :::      :::  :::     :::
      ,,:.,,,,,,,,,: `::, ,,   ::,::`   : :,::`  ::::   :::      :::  :::    :::
       ,:,,,,,,,,,,::,:   ,,  :.    :   ::    :   .:    :::      :::  :::::::
        :,,,,,,,,,,:,::   ,,  :      :  :     :   .:    :::      :::  :::::::::
  `     :,,,,,,,,,,:,::,  ,, .::::::::  :     :   .:    :::      :::  :::     :::
  `,...,,:,,,,,,,,,: .:,. ,, ,,         :     :   .:    :::      :::  :::     :::
    .,,,,::,,,,,,,:  `: , ,,  :     `   :     :   .:    :::      :::  :::     :::
      ...,::,,,,::.. `:  .,,  :,    :   :     :   .:    :::::::::::   :::     :::
           ,::::,,,. `:   ,,   :::::    :     :   .:    :::::::::     ::::::::::
           ,,:` `,,.
          ,,,    .,`
         ,,.     `,                                          GRAPH DATABASE
       ``        `.
                 ``                                          orientdb.com
                 `

2016-01-20 19:17:21:547 INFO  OrientDB auto-config DISKCACHE = 1,
   649MB (heap = 494MB os = 4, 192MB disk = 199, 595MB) [orientechnologies]
2016-01-20 19:17:21:816 INFO  Loading configuration from:
   /opt/orientdb/config/orientdb-server-config.xml... [OServerConfigurationLoaderXml]
2016-01-20 19:17:22:213 INFO  OrientDB Server v2.1.9-SNAPSHOT
   (build 2.1.x@r; 2016-01-07 10:51:24+0000) is starting up... [OServer]
2016-01-20 19:17:22:220 INFO  Databases directory: /opt/orientdb/databases [OServer]
2016-01-20 19:17:22:361 INFO  Port 0.0.0.0:2424 busy,
   trying the next available... [OServerNetworkListener]
2016-01-20 19:17:22:362 INFO  Listening binary connections on 0.0.0.0:2425
   (protocol v.32, socket = default) [OServerNetworkListener]
...
2016-01-20 19:17:22:614 INFO  Installing Script interpreter. WARN:
   authenticated clients can execute any kind of code into the server
   by using the following allowed languages:
   [sql] [OServerSideScriptInterpreter]
2016-01-20 19:17:22:615 INFO  OrientDB Server v2.1.9-SNAPSHOT
   (build 2.1.x@r; 2016-01-07 10:51:24+0000) is active. [OServer]
Running the console − You can use the following command to run the OrientDB under console.
$ orientdb
If it is installed successfully, you will receive the following output.
OrientDB console v.2.1.9-SNAPSHOT (build 2.1.x@r; 2016-01-07 10:51:24+0000) www.orientdb.com
Type 'help' to display all the supported commands.
Installing extensions for GREMLIN language v.2.6.0

orientdb>
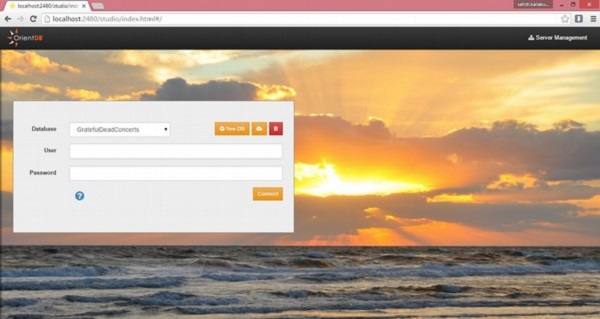
Running the Studio − After starting the server you can use the following URL (http://localhost:2480/) on your browser. You will get the following screenshot.
In Windows
Follow the given procedure for verifying OrientDB installation in Windows.
Running the server − You can use the following command to start the server.
> cd %ORIENTDB_HOME%in
> ./server.bat
If it is installed successfully, you will receive the following output.
          .
          .`        `
          ,      `:.
         `,`    ,:`
         .,.   :,,
		 .,,  ,,,
    .    .,.:::::  ````                                 :::::::::     :::::::::
    ,`   .::,,,,::.,,,,,,`;;                      .:    ::::::::::    :::    :::
    `,.  ::,,,,,,,:.,,.`  `                       .:    :::      :::  :::     :::
     ,,:,:,,,,,,,,::.   `        `         ``     .:    :::      :::  :::     :::
      ,,:.,,,,,,,,,: `::, ,,   ::,::`   : :,::`  ::::   :::      :::  :::    :::
       ,:,,,,,,,,,,::,:   ,,  :.    :   ::    :   .:    :::      :::  :::::::
        :,,,,,,,,,,:,::   ,,  :      :  :     :   .:    :::      :::  :::::::::
  `     :,,,,,,,,,,:,::,  ,, .::::::::  :     :   .:    :::      :::  :::     :::
  `,...,,:,,,,,,,,,: .:,. ,, ,,         :     :   .:    :::      :::  :::     :::
    .,,,,::,,,,,,,:  `: , ,,  :     `   :     :   .:    :::      :::  :::     :::
      ...,::,,,,::.. `:  .,,  :,    :   :     :   .:    :::::::::::   :::     :::
           ,::::,,,. `:   ,,   :::::    :     :   .:    :::::::::     ::::::::::
           ,,:` `,,.
          ,,,    .,`
         ,,.     `,                                          GRAPH DATABASE
       ``        `.
                 ``                                          orientdb.com
                 `

2016-01-20 19:17:21:547 INFO  OrientDB auto-config DISKCACHE = 1,649MB
   (heap = 494MB os = 4, 192MB disk = 199, 595MB) [orientechnologies]
2016-01-20 19:17:21:816 INFO  Loading configuration from:
   /opt/orientdb/config/orientdb-server-config.xml...
   [OServerConfigurationLoaderXml]
...
2016-01-20 19:17:22:615 INFO  OrientDB Server v2.1.9-SNAPSHOT
   (build 2.1.x@r; 2016-01-07 10:51:24+0000) is active. [OServer]
Running the console − You can use the following command to run OrientDB under console.
> %ORIENTDB_HOME%inconsole.bat
If it is installed successfully, you will receive the following output.
OrientDB console v.2.1.9-SNAPSHOT (build 2.1.x@r; 2016-01-07 10:51:24+0000) www.orientdb.com
Type 'help' to display all the supported commands.
Installing extensions for GREMLIN language v.2.6.0

orientdb>
Running the Studio − After starting the server you can use the following URL (http://localhost:2480/) on your browser. You will get the following screenshot.

OrientDB – Basic Concepts
The main feature of OrientDB is to support multi-model objects, i.e. it supports different models like Document, Graph, Key/Value and Real Object. It contains a separate API to support all these four models.
Document Model
The terminology Document model belongs to NoSQL database. It means the data is stored in the Documents and the group of Documents are called as Collection. Technically, document means a set of key/value pairs or also referred to as fields or properties.
OrientDB uses the concepts such as classes, clusters, and link for storing, grouping, and analyzing the documents.
The following table illustrates the comparison between relational model, document model, and OrientDB document model −
| Relational Model | Document Model | OrientDB Document Model |
|---|---|---|
| Table | Collection | Class or Cluster |
| Row | Document | Document |
| Column | Key/value pair | Document field |
| Relationship | Not available | Link |
Graph Model
A graph data structure is a data model that can store data in the form of Vertices (Nodes) interconnected by Edges (Arcs). The idea of OrientDB graph database came from property graph. The vertex and edge are the main artifacts of the Graph model. They contain the properties, which can make these appear similar to documents.
The following table shows a comparison between graph model, relational data model, and OrientDB graph model.
| Relational Model | Graph Model | OrientDB Graph Model |
|---|---|---|
| Table | Vertex and Edge Class | Class that extends “V” (for Vertex) and “E” (for Edges) |
| Row | Vertex | Vertex |
| Column | Vertex and Edge property | Vertex and Edge property |
| Relationship | Edge | Edge |
The Key/Value Model
The Key/Value model means that data can be stored in the form of key/value pair where the values can be of simple and complex types. It can support documents and graph elements as values.
The following table illustrates the comparison between relational model, key/value model, and OrientDB key/value model.
| Relational Model | Key/Value Model | OrientDB Key/Value Model |
|---|---|---|
| Table | Bucket | Class or Cluster |
| Row | Key/Value pair | Document |
| Column | Not available | Document field or Vertex/Edge property |
| Relationship | Not available | Link |
The Object Model
This model has been inherited by Object Oriented programming and supports Inheritance between types (sub-types extends the super-types), Polymorphism when you refer to a base class and Direct binding from/to Objects used in programming languages.
The following table illustrates the comparison between relational model, Object model, and OrientDB Object model.
| Relational Model | Object Model | OrientDB Object Model |
|---|---|---|
| Table | Class | Class or Cluster |
| Row | Object | Document or Vertex |
| Column | Object property | Document field or Vertex/Edge property |
| Relationship | Pointer | Link |
Before go ahead in detail, it is better to know the basic terminology associated with OrientDB. Following are some of the important terminologies.
Record
The smallest unit that you can load from and store in the database. Records can be stored in four types.
- Document
- Record Bytes
- Vertex
- Edge
Record ID
When OrientDB generates a record, the database server automatically assigns a unit identifier to the record, called RecordID (RID). The RID looks like #<cluster>:<position>. <cluster> means cluster identification number and the <position> means absolute position of the record in the cluster.
Documents
The Document is the most flexible record type available in OrientDB. Documents are softly typed and are defined by schema classes with defined constraint, but you can also insert the document without any schema, i.e. it supports schema-less mode too.
Documents can be easily handled by export and import in JSON format. For example, take a look at the following JSON sample document. It defines the document details.
{
   "id"        : "1201",
   "name"      : "Jay",
   "job"       : "Developer",
   "creations" : [
      {
         "name"    : "Amiga",
         "company" : "Commodore Inc."
      },

      {
         "name"    : "Amiga 500",
         "company" : "Commodore Inc."
      }
   ]
}
RecordBytes
Record Type is the same as BLOB type in RDBMS. OrientDB can load and store document Record type along with binary data.
Vertex
OrientDB database is not only a Document database but also a Graph database. The new concepts such as Vertex and Edge are used to store the data in the form of graph. In graph databases, the most basic unit of data is node, which in OrientDB is called a vertex. The Vertex stores information for the database.
Edge
There is a separate record type called the Edge that connects one vertex to another. Edges are bidirectional and can only connect two vertices. There are two types of edges in OrientDB, one is regular and another one lightweight.
Class
The class is a type of data model and the concept drawn from the Object-oriented programming paradigm. Based on the traditional document database model, data is stored in the form of collection, while in the Relational database model data is stored in tables. OrientDB follows the Document API along with OPPS paradigm. As a concept, the class in OrientDB has the closest relationship with the table in relational databases, but (unlike tables) classes can be schema-less, schema-full or mixed. Classes can inherit from other classes, creating trees of classes. Each class has its own cluster or clusters, (created by default, if none are defined).
Cluster
Cluster is an important concept which is used to store records, documents, or vertices. In simple words, Cluster is a place where a group of records are stored. By default, OrientDB will create one cluster per class. All the records of a class are stored in the same cluster having the same name as the class. You can create up to 32,767(2^15-1) clusters in a database.
The CREATE class is a command used to create a cluster with specific name. Once the cluster is created you can use the cluster to save records by specifying the name during the creation of any data model.
Relationships
OrientDB supports two kinds of relationships: referenced and embedded. Referenced relationships means it stores direct link to the target objects of the relationships. Embedded relationships means it stores the relationship within the record that embeds it. This relationship is stronger than the reference relationship.
Database
The database is an interface to access the real storage. IT understands high-level concepts such as queries, schemas, metadata, indices, and so on. OrientDB also provides multiple database types. For more information on these types, see Database Types.
OrientDB – Data Types
OrientDB supports several data types natively. Following is the complete table on the same.
| Sr. No. | Type | Description |
|---|---|---|
| 1 | Boolean |
Handles only the values True or False. Java types: java.lang.Boolean Min: 0 Max: 1 |
| 2 | Integer |
32-bit signed integers. Java types: java.lang.Interger Min: -2,147,483,648 Max: +2,147,483,647 |
| 3 | Short |
Small 16-bit signed integers. Java types: java.lang.short Min: -32,768 Max: 32,767 |
| 4 | Long |
Big 64-bit signed integers. Java types: java.lang.Long Min: -263 Max: +263-1 |
| 5 | Float |
Decimal numbers. Java types: java.lang.Float : 2-149 Max: (2-2-23)*2,127 |
| 6 | Double |
Decimal numbers with high precision. Java types: Java.lang.Double. Min: 2-1074 Max: (2-2-52)*21023 |
| 7 | Date-time |
Any date with the precision up to milliseconds. Java types: java.util.Date |
| 8 | String |
Any string as alphanumeric sequence of chars. Java types: java.lang.String |
| 9 | Binary |
Can contain any value as byte array. Java types: byte[ ] Min: 0 Max: 2,147,483,647 |
| 10 | Embedded |
The record is contained inside the owner. The contained record has no RecordId. Java types: ORecord |
| 11 | Embedded list |
The records are contained inside the owner. The contained records have no RecordIds and are reachable only by navigating the owner record. Java types: List<objects> Min: 0 Max: 41,000,000 items |
| 12 | Embedded set |
The records are contained inside the owner. The contained records have no RecordId and are reachable only by navigating the owner record. Java types: set<objects> Min: 0 Max: 41,000,000 items |
| 13 | Embedded map |
The records are contained inside the owner as values of the entries, while the keys can only be strings. The contained records have no RecordId and are reachable only by navigating the owner Record. Java types: Map<String, ORecord> Min: 0 Max: 41,000,000 items |
| 14 | Link |
Link to another Record. It’s a common one-to-one relationship Java Types: ORID, <? extends ORecord> Min: 1 Max: 32767:2^63-1 |
| 15 | Link list |
Links to other Records. It’s a common one-to-many relationship where only the RecordIds are stored. Java types: List<? Extends ORecord> Min: 0 Max: 41,000,000 items |
| 16 | Link set |
Links to other records. It’s a common one-to-many relationship. Java types: Set<? extends ORecord> Min: 0 Max: 41,000,000 items |
| 17 | Link map |
Links to other records as value of the entries, while keys can only be strings. It’s a common one-to-many relationship. Only the RecordIds are stored. Java types: Map<String, ? extends Record> Min: 0 Max: 41,000,000 items |
| 18 | Byte |
Single byte. Useful to store small 8-bit signed integers. Java types: java.lang.Byte Min: -128 Max: +127 |
| 19 | Transient | Any value not stored on database. |
| 20 | Date |
Any date as year, month and day. Java Types: java.util.Date |
| 21 | Custom |
Used to store a custom type providing the Marshall and Unmarshall methods. Java types: OSerializableStream Min: 0 Max: x |
| 22 | Decimal |
Decimal numbers without rounding. Java types: java.math.BigDecimal |
| 23 | LinkBag |
List of RecordIds as specific RidBag. Java types: ORidBag |
| 24 | Any |
Not determinate type, used to specify collections of mixed type, and null. |
In the following chapters, how to use these data types in OrientDB is discussed.
OrientDB – Console Modes
The OrientDB Console is a Java Application made to work against OrientDB databases and Server instances. There are several console modes that OrientDB supports.
Interactive Mode
This is the default mode. Just launch the console by executing the following script bin/console.sh (or bin/console.bat in MS Windows systems). Make sure to have execution permission on it.
OrientDB console v.1.6.6 www.orientechnologies.com
Type 'help' to display all the commands supported.

orientdb>
Once done, the console is ready to accept commands.
Batch Mode
To execute commands in batch mode run the following bin/console.sh (or bin/console.bat in MS Windows systems) script passing all the commands separated with semicolon “;”.
orientdb> console.bat "connect remote:localhost/demo;select * from profile"
Or call the console script passing the name of the file in text format containing the list of commands to execute. Commands must be separated with semicolon “;”.
Example
Command.txt contains the list of commands which you want to execute through OrientDB console. The following command accepts the batch of commands from the command.txt file.
orientdb> console.bat commands.txt
In batch mode, you can ignore errors to let the script continue the execution by setting the “ignoreErrors” variable to true.
orientdb> set ignoreErrors true
Enable Echo
When you run console commands in pipeline, you will need to display them. Enable “echo” of commands by setting it as property at the beginning. Following is the syntax to enable echo property in OrientDB console.
orientdb> set echo true
OrientDB – Create Database
The SQL Reference of the OrientDB database provides several commands to create, alter, and drop databases.
The following statement is a basic syntax of Create Database command.
CREATE DATABASE <database-url> [<user> <password> <storage-type> [<db-type>]]
Following are the details about the options in the above syntax.
<database-url> − Defines the URL of the database. URL contains two parts, one is <mode> and the second one is <path>.
<mode> − Defines the mode, i.e. local mode or remote mode.
<path> − Defines the path to the database.
<user> − Defines the user you want to connect to the database.
<password> − Defines the password for connecting to the database.
<storage-type> − Defines the storage types. You can choose between PLOCAL and MEMORY.
Example
You can use the following command to create a local database named demo.
Orientdb> CREATE DATABASE PLOCAL:/opt/orientdb/databses/demo
If the database is successfully created, you will get the following output.
Database created successfully.
Current database is: plocal: /opt/orientdb/databases/demo

orientdb {db = demo}>
OrientDB – Alter Database
Database is a one of the important data models with different attributes that you can modify as per your requirements.
The following statement is the basic syntax of the Alter Database command.
ALTER DATABASE <attribute-name> <attribute-value>
Where <attribute-name> defines the attribute that you want to modify and <attributevalue> defines the value you want to set for that attribute.
The following table defines the list of supported attributes for altering a database.
| Sr.No. | Attribute Name | Description |
|---|---|---|
| 1 | STATUS | Defines the database’s status between different attributes. |
| 2 | IMPORTING | Sets the importing status. |
| 3 | DEFAULTCLUSTERID | Sets the default cluster using ID. By default it is 2. |
| 4 | DATEFORMAT | Sets the particular date format as default. By default it is “yyyy-MM-dd”. |
| 5 | DATETIMEFORMAT | Sets the particular date time format as default. By default it is “yyyy-MM-dd HH:mm:ss”. |
| 6 | TIMEZONE | Sets the particular time zone. By default it is Java Virtual Machine’s (JVM’s) default time zone. |
| 7 | LOCALECOUNTRY | Sets the default locale country. By default it is JVM’s default locale country. For example: “GB”. |
| 8 | LOCALELANGUAGE | Sets the default locale language. By default it is JVM’s default locale language. For example: “en”. |
| 9 | CHARSET | Sets the type of character set. By default it is JVM’s default charset. For example: “utf8”. |
| 10 | CLUSTERSELECTION | Sets the default strategy used for selecting the cluster. These strategies are created along with the class creation. Supported strategies are default, roundrobin, and balanced. |
| 11 | MINIMUMCLUSTERS | Sets the minimum number of clusters to create automatically when a new class is created. By default it is 1. |
| 12 | CUSTOM | Sets the custom property. |
| 13 | VALIDATION | Disables or enables the validations for entire database. |
Example
From the version of OrientDB-2.2, the new SQL parser is added which will not allow the regular syntax in some cases. Therefore, we have to disable the new SQL parser (StrictSQL) in some cases. You can use the following Alter database command to disable the StrictSQL parser.
orientdb> ALTER DATABASE custom strictSQL = false
If the command is executed successfully, you will get the following output.
Database updated successfully
OrientDB – Backup Database
Like RDBMS, OrientDB also supports the backup and restore operations. While executing the backup operation, it will take all files of the current database into a compressed zip format using the ZIP algorithm. This feature (Backup) can be availed automatically by enabling the Automatic-Backup server plugin.
Taking backup of a database or exporting a database is the same, however, based on the procedure we have to know when to use backup and when to use export.
While taking backup, it will create a consistent copy of a database, all further write operations are locked and waiting to finish the backup process. In this operation, it will create a read-only backup file.
If you need the concurrent read and write operation while taking a backup you have to choose exporting a database instead of taking backup of a database. Export doesn’t lock the database and allows concurrent writes during the export process.
The following statement is the basic syntax of database backup.
./backup.sh <dburl> <user> <password> <destination> [<type>]
Following are the details about the options in the above syntax.
<dburl> − The database URL where the database is located either in the local or in the remote location.
<user> − Specifies the username to run the backup.
<password> − Provides the password for the particular user.
<destination> − Destination file location stating where to store the backup zip file.
<type> − Optional backup type. It has either of the two options.
-
Default − locks the database during the backup.
-
LVM − uses LVM copy-on-write snapshot in background.
Example
Take a backup of the database demo which is located in the local file system /opt/orientdb/databases/demo into a file named sample-demo.zip and located into the current directory.
You can use the following command to take a backup of the database demo.
$ backup.sh plocal: opt/orientdb/database/demo admin admin ./backup-demo.zip
Using Console
The same you can do using the OrientDB console. Before taking the backup of a particular database, you have to first connect to the database. You can use the following command to connect to the database named demo.
orientdb> CONNECT PLOCAL:/opt/orientdb/databases/demo admin admin
After connecting you can use the following command to take backup of the database into a file named ‘backup-demo.zip’ in the current directory.
orientdb {db=demo}> BACKUP DATABASE ./backup-demo.zip
If this command is executed successfully, you will get some success notifications along with following message.
Backup executed in 0.30 seconds
OrientDB – Restore Database
As like RDBMS, OrientDB also supports restoring operation. Only from the console mode, you can execute this operation successfully.
The following statement is the basic syntax for restoring operation.
orientdb> RESTORE DATABSE <url of the backup zip file>
Example
You have to perform this operation only from the console mode. Therefore, first you have to start the OrientDB console using the following OrientDB command.
$ orientdb
Then, connect to the respective database to restore the backup. You can use the following command to connect to the database named demo.
orientdb> CONNECT PLOCAL:/opt/orientdb/databases/demo admin admin
After successful connection, you can use the following command to restore the backup from ‘backup-demo.zip’ file. Before executing, make sure the backup-demo.zip file is placed in the current directory.
Orientdb {db = demo}> RESTORE DATABASE backup-demo.zip
If this command is executed successfully, you will get some success notifications along with the following message.
Database restored in 0.26 seconds
OrientDB – Connect Database
This chapter explains how to connect to a particular database from the OrientDB command line. It opens a database.
The following statement is the basic syntax of the Connect command.
CONNECT <database-url> <user> <password>
Following are the details about the options in the above syntax.
<database-url> − Defines the URL of the database. URL contains two parts one is <mode> and the second one is <path>.
<mode> − Defines the mode, i.e. local mode or remote mode.
<path> − Defines the path to the database.
<user> − Defines the user you want to connect to the database.
<password> − Defines the password for connecting to the database.
Example
We have already created a database named ‘demo’ in the previous chapters. In this example, we will connect to that using the user admin.
You can use the following command to connect to demo database.
orientdb> CONNECT PLOCAL:/opt/orientdb/databases/demo admin admin
If it is successfully connected, you will get the following output −
Connecting to database [plocal:/opt/orientdb/databases/demo] with user 'admin'…OK
Orientdb {db = demo}>
OrientDB – Disconnect Database
This chapter explains how to disconnect to a particular database from the OrientDB command line. It closes the currently open database.
The following statement is the basic syntax of the Disconnect command.
DISCONNECT
Note − You can use this command only after connecting to a particular database and it will only close the currently running database.
Example
In this example, we will use the same database named ‘demo’ that we created in the previous chapter. We will disconnect from demo database.
You can use the following command to disconnect the database.
orientdb {db = demo}> DISCONNECT
If it is successfully disconnected, you will get the following output −
Disconnecting to database [plocal:/opt/orientdb/databases/demo] with user 'admin'…OK
orientdb>
OrientDB – Info Database
This chapter explains how to get information of a particular database from the OrientDB command line.
The following statement is the basic syntax of the Info command.
info
Note − You can use this command only after connecting to a particular database and it will retrieve the information of only the currently running database.
Example
In this example, we will use the same database named ‘demo’ that we created in the previous chapter. We will retrieve the basic information from demo database.
You can use the following command to disconnect the database.
orientdb {db = demo}> info
If it is successfully disconnected, you will get the following output.
Current database: demo (url = plocal:/opt/orientdb/databases/demo)

DATABASE PROPERTIES
--------------------------------+---------------------------------------------+
 NAME                           | VALUE                                       |
--------------------------------+---------------------------------------------+
 Name                           | null                                        |
 Version                        | 14                                          |
 Conflict Strategy              | version                                     |
 Date format                    | yyyy-MM-dd                                  |
 Datetime format                | yyyy-MM-dd HH:mm:ss                         |
 Timezone                       | Asia/Kolkata                                |
 Locale Country                 | IN                                          |
 Locale Language                | en                                          |
 Charset                        | UTF-8                                       |
 Schema RID                     | #0:1                                        |
 Index Manager RID              | #0:2                                        |
 Dictionary RID                 | null                                        |
--------------------------------+---------------------------------------------+

DATABASE CUSTOM PROPERTIES:
 +-------------------------------+--------------------------------------------+
 | NAME                          | VALUE                                      |
 +-------------------------------+--------------------------------------------+
 | strictSql                     | true                                       |
 +-------------------------------+--------------------------------------------+
CLUSTERS (collections)
---------------------------------+-------+-------------------+----------------+
 NAME                            | ID    | CONFLICT STRATEGY | RECORDS        |
---------------------------------+-------+-------------------+----------------+
OrientDB – List Database
This chapter explains how to get the list of all databases in an instance from the OrientDB command line.
The following statement is the basic syntax of the info command.
LIST DATABASES
Note − You can use this command only after connecting to a local or remote server.
Example
Before retrieving the list of databases, we have to connect to the localhost server through the remote server. It is required to remind that the username and password for connecting to the localhost instance is guest and guest respectively, which is configured in the orintdb/config/orientdb-server-config.xml file.
You can use the following command to connect to the localhost database server instance.
orientdb> connect remote:localhost guest
It will ask the password. As per the config file password for guest is also guest. If it is successfully connected, you will get the following output.
Connecting to remote Server instance [remote:localhost] with user 'guest'...OK
orientdb {server = remote:localhost/}>
After connecting to the localhost database server you can use the following command to list the databases.
orientdb {server = remote:localhost/}> list databases
If it is successfully executed, you will get the following output −
Found 6 databases:
* demo (plocal)
* s2 (plocal)
* s1 (plocal)
* GratefulDeadConcerts (plocal)
* s3 (plocal)
* sample (plocal)
orientdb {server = remote:localhost/}>
OrientDB – Freeze Database
Whenever you want to make the database state as static it means a state where the database didn’t respond to any of the read and write operations. Simply said, the database is in freeze state.
In this chapter, you can learn how to freeze the database from the OrientDB command line.
The following statement is the basic syntax of the freeze database command.
FREEZE DATABASE
Note − You can use this command only after connecting to a particular database either in remote or local database.
Example
In this example, we will use the same database named ‘demo’ that we created in the previous chapter. We will freeze this database from CLI.
You can use the following command to freeze the database.
Orientdb {db = demo}> FREEZE DATABASE
If it is successfully executed, you will get the following output.
Database 'demo' was frozen successfully
OrientDB – Release Database
In this chapter, you can learn how to release the database from the freeze state through OrientDB command line.
The following statement is the basic syntax of the Release database command.
RELEASE DATABASE
Note − You can use this command only after connecting to a particular database, which is in freeze state.
Example
In this example, we will use the same database named ‘demo’ that we created in the previous chapter. We will release the database that was freezed in the previous chapter.
You can use the following command to release the database.
Orientdb {db = demo}> RELEASE DATABASE
If it is successfully executed, you will get the following output.
Database 'demo' was release successfully
OrientDB – Config Database
In this chapter, you can learn how to display the configuration of a particular database through OrientDB command line. This command is applicable for both local and remote databases.
Configuration information contains default cache either enabled or not, the size of that cache, the load factor value, max memory for map, node page size, pool minimum and maximum size, etc.
The following statement is the basic syntax of the config database command.
CONFIG
Note − You can use this command only after connecting to a particular database.
Example
In this example, we will use the same database named ‘demo’ that we created in the previous chapter.
You can use the following command to display the configuration of demo database.
Orientdb {db = demo}> CONFIG
If it is successfully executed, you will get the following output.
LOCAL SERVER CONFIGURATION:
+---------------------------------------+-------------------------+
| NAME                                  | VALUE                   |
+---------------------------------------+-------------------------+
| environment.dumpCfgAtStartup          | false                   |
| environment.concurrent                | true                    |
| environment.allowJVMShutdown          | true                    |
| script.pool.maxSize                   | 20                      |
| memory.useUnsafe                      | true                    |
| memory.directMemory.safeMode          | true                    |
| memory.directMemory.trackMode         | false                   |
|………………………………..                         |                         |
| storage.lowestFreeListBound           | 16                      |
| network.binary.debug                  | false                   |
| network.http.maxLength                | 1000000                 |
| network.http.charset                  | utf-8                   |
| network.http.jsonResponseError        | true                    |
| network.http.json                     | false                   |
| tx.log.fileType                       | classic                 |
| tx.log.synch                          | false                   |
| tx.autoRetry                          | 1                       |
| client.channel.minPool                | 1                       |
| storage.keepOpen                      | true                    |
| cache.local.enabled                   | true                    |
+---------------------------------------+-------------------------+
orientdb {db = demo}>
In the above list of configuration parameters, if you want to change any of the parameter value then you can do it from the command line easily using config set and get command.
Config Set
You can update the configuration variable value by using the CONFIG SET command.
The following statement is the basic syntax of the config set command.
CONFIG SET <config-variable> <config-value>
Note − You can use this command only after connecting to a particular database.
Example
In this example, we will use the same database named ‘demo’ that we created in the previous chapter. We will modify the ‘tx.autoRetry’ variable value to 5.
You can use the following command to set the configuration of demo database.
orientdb {db = demo}> CONFIG SET tx.autoRetry 5
If it is successfully executed, you will get the following output.
Local configuration value changed correctly
Config Get
You can display the configuration variable value by using the CONFIG GET command.
The following statement is the basic syntax of the config get command.
CONFIG GET <config-variable>
Note − You can use this command only after connecting to a particular database.
Example
In this example, we will use the same database named ‘demo’ that we created in the previous chapter. We will try to retrieve the ‘tx.autoRetry’ variable value.
You can use the following command to display the configuration of demo database.
orientdb {db = demo}> CONFIG GET tx.autoRetry
If it is successfully executed, you will get the following output.
Local configuration: tx.autoRetry = 5
OrientDB – Export Database
Like RDBMS, OrientDB also provides features like Export and Import the database. OrientDB uses the JSON format to export the data. By default export command is using the GZIP algorithm to compress the files.
While exporting a database it is not locking the database, which means you can perform concurrent read and write operations on it. It also means that you can create an exact copy of that data because of concurrent read and write operations.
In this chapter, you can learn how to export the database from the OrientDB command line.
The following statement is the basic syntax of the Export database command.
EXPORT DATABASE <output file>
Note − You can use this command only after connecting to a particular database.
Example
In this example, we will use the same database named ‘demo’ that we created in the previous chapter. You can use the following command to export the database to a file named ‘export-demo’.
orientdb {db = demo}> EXPORT DATABASE ./export-demo.export
If it is successfully executed, it will create a file named ‘export-demo.zip’ or ‘exportdemo.gz’ based on the operating system and you will get the following output.
Exporting current database to: DATABASE /home/linuxtp/Desktop/demo.export in
GZipped JSON format ...

Started export of database 'demo' to /home/linuxtp/Desktop/demo.export.gz...
Exporting database info...OK
Exporting clusters...OK (12 clusters)
Exporting schema...OK (11 classes)
Exporting records...
- Cluster 'internal' (id = 0)...OK (records = 3/3)
- Cluster 'index' (id = 1)...OK (records = 0/0)
- Cluster 'manindex' (id = 2)...OK (records = 0/0)
- Cluster 'default' (id = 3)...OK (records = 0/0)
- Cluster 'orole' (id = 4)...OK (records = 3/3)
- Cluster 'ouser' (id = 5)...OK (records = 3/3)
- Cluster 'ofunction' (id = 6)...OK (records = 0/0)
- Cluster 'oschedule' (id = 7)...OK (records = 0/0)
- Cluster 'orids' (id = 8)...OK (records = 0/0)
- Cluster 'v' (id = 9)...OK (records = 0/0)
- Cluster 'e' (id = 10)...OK (records = 0/0)
- Cluster '_studio' (id = 11)...OK (records = 1/1)

Done. Exported 10 of total 10 records

Exporting index info...
- Index dictionary...OK
- Index OUser.name...OK
- Index ORole.name...OK
OK (3 indexes)
Exporting manual indexes content...
- Exporting index dictionary ...OK (entries = 0)
OK (1 manual indexes)

Database export completed in 377ms
OrientDB – Import Database
Whenever you want to import the database, you must use the JSON format exported file, which is generated by export command.
In this chapter you can learn how to import the database from the OrientDB command line.
The following statement is the basic syntax of the Import database command.
IMPORT DATABASE <input file>
Note − You can use this command only after connecting to a particular database.
Example
In this example, we will use the same database named ‘demo’ that we created in the previous chapter. You can use the following command to import the database to a file named ‘export-demo.gz’.
orientdb {db = demo}> IMPORT DATABASE ./export-demo.export.gz
If it is successfully executed, you will get the following output along with the successful notification.
Database import completed in 11612ms
OrientDB – Commit Database
Similar to RDBMS, OrientDB also provides transaction concepts like Commit and Rollback. Commit refers to closing the transaction by saving all changes to the database. Rollback refers to recovering the database state to the point where you opened the transaction.
The following statement is the basic syntax of the Commit database command.
COMMIT
Note − You can use this command only after connecting to a particular database and after beginning the transaction.
Example
In this example, we will use the same database named ‘demo’ that we created in the previous chapter. We will see the operation of commit transaction and store a record using transactions.
First, start the transaction using the following BEGIN command.
orientdb {db = demo}> BEGIN
Then, insert a record into an employee table with the values id = 12 and name = satish.P using the following command.
orientdb> INSERT INTO employee (id, name) VALUES (12, 'satish.P')
You can use the following command to commit the transaction.
orientdb> commit
If this transaction is successfully committed, you will get the following output.
Transaction 2 has been committed in 4ms
OrientDB – Rollback Database
In this chapter, you will learn how to roll back the un-committed transaction through the OrientDB command line interface.
The following statement is the basic syntax of the Rollback database command.
ROLLBACK
Note − You can use this command only after connecting to a particular database and after beginning the transaction.
Example
In this example, we will use the same database named ‘demo’ that we created in the previous chapter. We will see the operation of rollback transaction and store a record using transactions.
First, start the transaction using the following BEGIN command.
orientdb {db = demo}> BEGIN
Then, insert a record into an employee table with the values id = 12 and name = satish.P using the following command.
orientdb> INSERT INTO employee (id, name) VALUES (12, 'satish.P')
You can use the following command to retrieve the records from the Employee table.
orientdb> SELECT FROM employee WHERE name LIKE '%.P'
If this command is executed successfully, you will get the following output.
---+-------+--------------------
 # | ID   | name
---+-------+--------------------
 0 | 12   | satish.P
---+-------+--------------------
1 item(s) found. Query executed in 0.076 sec(s).
You can now use the following command to Rollback this transaction.
orientdb> ROLLBACK
Check the select query again to retrieve the same record from the employee table.
orientdb> SELECT FROM employee WHERE name LIKE '%.P'
If the rollback is executed successfully, you will get 0 records found in the output.
0 item(s) found. Query executed in 0.037 sec(s).
OrientDB – Optimize Database
As per technical terminology Optimization means “Achieve the better possible performance in the quickest amount of time.” With reference to database, optimization involves maximizing the speed and efficiency with which data is retrieved.
OrientDB supports lightweight edges, which means a direct relation between the data entities. In simple terms, it is a field-to-field relation. OrientDB provides different ways to optimize the database. It supports the conversion of regular edges to lightweight edges.
The following statement is the basic syntax of the Optimize database command.
OPTMIZE DATABASE [-lwedges] [-noverbose]
Where lwedges converts regular edges into lightweight edges and noverbose disables the output.
Example
In this example, we will use the same database named ‘demo’ that we created in the previous chapter. You can use the following optimize database command.
OPTIMIZE DATABASE -lwedges
If it is successfully executed, you will get some successful notifications along with the completion message.
Database Optimization completed in 35ms
OrientDB – Drop Database
Similar to RDBMS, OrientDB provides the feature to drop a database. Drop database refers to removing a database completely.
The following statement is the basic syntax of the Drop database command.
DROP DATABASE [<database-name> <server-username> <server-user-password>]
Following are the details about the options in the above syntax.
<database-name> − Database name you want to drop.
<server-username> − Username of the database who has the privilege to drop a database.
<server-user-password> − Password of the particular user.
Example
There are two ways to drop a database, one is drop a currently open database and second is drop a particular database by providing the particular name.
In this example, we will use the same database named ‘demo’ that we created in an earlier chapter. You can use the following command to drop a database demo.
orientdb {db = demo}> DROP DATABASE
If this command is successfully executed, you will get the following output.
Database 'demo' deleted successfully
OR
You can use another command to drop a database as follows.
orientdb> DROP DATABASE PLOCAL:/opt/orientdb/databases/demo admin admin
If this command is successfully executed, you will get the following output.
Database 'demo' deleted successfully
OrientDB – Insert Record
OrientDB is a NoSQL database that can store the documents and graph-oriented data. NoSQL database does not contain any table, so how can you insert data as a record. Here you can see the table data in the form of class, property, vertex, and edge meaning classes are like tables, and properties are like files in the tables.
We can define all these entities using schema in OrientDB. Property data can be inserted into a class. Insert command creates a new record in the database schema. Records can be schema-less or follow some specified rules.
The following statement is the basic syntax of the Insert Record command.
INSERT INTO [class:]<class>|cluster:<cluster>|index:<index>
   [(<field>[,]*) VALUES (<expression>[,]*)[,]*]|
   [SET <field> = <expression>|<sub-command>[,]*]|
   [CONTENT {<JSON>}]
   [RETURN <expression>]
   [FROM <query>]
Following are the details about the options in the above syntax.
SET − Defines each field along with the value.
CONTENT − Defines JSON data to set field values. This is optional.
RETURN − Defines the expression to return instead of number of records inserted. The most common use cases are −
-
@rid − Returns the Record ID of the new record.
-
@this − Returns the entire new record.
FROM − Where you want to insert the record or a result set.
Example
Let us consider a Customer table with the following fields and types.
| Sr.No. | Field Name | Type |
|---|---|---|
| 1 | Id | Integer |
| 2 | Name | String |
| 3 | Age | Integer |
You can create the Schema (table) by executing the following commands.
CREATE DATABASE PLOCAL:/opt/orientdb/databases/sales
CREATE CLASS Customer
CREATE PROPERTY Customer.id integer
CREATE PROPERTY Customer.name String
CREATE PROPERTY Customer.age integer
After executing all the commands, you will get the table name Customer with id, name, and age fields. You can check the table by executing select query into the Customer table.
OrientDB provides different ways to insert a record. Consider the following Customer table containing the sample records.
| Sr.No. | Name | Age |
|---|---|---|
| 1 | Satish | 25 |
| 2 | Krishna | 26 |
| 3 | Kiran | 29 |
| 4 | Javeed | 21 |
| 5 | Raja | 29 |
The following command is to insert the first record into the Customer table.
INSERT INTO Customer (id, name, age) VALUES (01,'satish', 25)
If the above command is successfully executed, you will get the following output.
Inserted record 'Customer#11:0{id:1,name:satish,age:25} v1' in 0.069000 sec(s).
The following command is to insert the second record into the Customer table.
INSERT INTO Customer SET id = 02, name = 'krishna', age = 26
If the above command is successfully executed, you will get the following output.
Inserted record 'Customer#11:1{id:2,age:26,name:krishna} v1' in 0.005000 sec(s).
The following command is to insert the third record into the Customer table.
INSERT INTO Customer CONTENT {"id": "03", "name": "kiran", "age": "29"}
If the above command is successfully executed, you will get the following output.
Inserted record 'Customer#11:2{id:3,name:kiran,age:29} v1' in 0.004000 sec(s).
The following command is to insert the next two records into the Customer table.
INSERT INTO Customer (id, name, age) VALUES (04,'javeed', 21), (05,'raja', 29)
If the above command is successfully executed, you will get the following output.
Inserted record '[Customer#11:3{id:4,name:javeed,age:21} v1,
Customer#11:4{id:5,name:raja,age:29} v1]' in 0.007000 sec(s).
You can check if all these records are inserted or not by executing the following command.
SELECT FROM Customer
If the above command is successfully executed, you will get the following output.
----+-----+--------+----+-------+----
#   |@RID |@CLASS  |id  |name   |age
----+-----+--------+----+-------+----
0   |#11:0|Customer|1   |satish |25
1   |#11:1|Customer|2   |krishna|26
2   |#11:2|Customer|3   |kiran  |29
3   |#11:3|Customer|4   |javeed |21
4   |#11:4|Customer|5   |raja   |29
----+-----+--------+----+-------+----
OrientDB – Display Records
Similar to RDBMS, OrientDB supports different types of SQL queries to retrieve the records from the database. While retrieving the records we have different variations or options of queries along with the select statement.
The following statement is the basic syntax of the SELECT command.
SELECT [ <Projections> ] [ FROM <Target> [ LET <Assignment>* ] ]
   [ WHERE <Condition>* ]
   [ GROUP BY <Field>* ]
   [ ORDER BY <Fields>* [ ASC|DESC ] * ]
   [ UNWIND <Field>* ]
   [ SKIP <SkipRecords> ]
   [ LIMIT <MaxRecords> ]
   [ FETCHPLAN <FetchPlan> ]
   [ TIMEOUT <Timeout> [ <STRATEGY> ] ]
   [ LOCK default|record ]
   [ PARALLEL ]
   [ NOCACHE ]
Following are the details about the options in the above syntax.
<Projections> − Indicates the data you want to extract from the query as a result records set.
FROM − Indicates the object to query. This can be a class, cluster, single Record ID, set of Record IDs. You can specify all these objects as target.
WHERE − Specifies the condition to filter the result-set.
LET − Indicates the context variable which are used in projections, conditions or sub queries.
GROUP BY − Indicates the field to group the records.
ORDER BY − Indicates the filed to arrange a record in order.
UNWIND − Designates the field on which to unwind the collection of records.
SKIP − Defines the number of records you want to skip from the start of the result-set.
LIMIT − Indicates the maximum number of records in the result-set.
FETCHPLAN − Specifies the strategy defining how you want to fetch results.
TIMEOUT − Defines the maximum time in milliseconds for the query.
LOCK − Defines the locking strategy. DEFAULT and RECORD are the available lock strategies.
PARALLEL − Executes the query against ‘x’ concurrent threads.
NOCACHE − Defines whether you want to use cache or not.
Example
Let’s consider the following Customer table created in the previous chapter.
| Sr.No. | Name | Age |
|---|---|---|
| 1 | Satish | 25 |
| 2 | Krishna | 26 |
| 3 | Kiran | 29 |
| 4 | Javeed | 21 |
| 5 | Raja | 29 |
Try different select queries to retrieve the data records from the Customer table.
Method 1 − You can use the following query to select all records from the Customer table.
orientdb {db = demo}> SELECT FROM Customer
If the above query is executed successfully, you will get the following output.
----+-----+--------+----+-------+----
#   |@RID |@CLASS  |id  |name   |age
----+-----+--------+----+-------+----
0   |#11:0|Customer|1   |satish |25
1   |#11:1|Customer|2   |krishna|26
2   |#11:2|Customer|3   |kiran  |29
3   |#11:3|Customer|4   |javeed |21
4   |#11:4|Customer|5   |raja   |29
----+-----+--------+----+-------+----
Method 2 − Select all records whose name starts with the letter ‘k‘.
orientdb {db = demo}> SELECT FROM Customer WHERE name LIKE 'k%'
OR you can use the following query for the above example.
orientdb {db = demo}> SELECT FROM Customer WHERE name.left(1) = 'k'
If the above query is executed successfully, you will get the following output.
----+-----+--------+----+-------+----
#   |@RID |@CLASS  |id  |name   |age
----+-----+--------+----+-------+----
0   |#11:1|Customer|2   |krishna|26
1   |#11:2|Customer|3   |kiran  |29
----+-----+--------+----+-------+----
Method 3 − Select id, name records from the Customer table with names in uppercase letters.
orientdb {db = demo}> SELECT id, name.toUpperCase() FROM Customer
If the above query is executed successfully, you will get the following output.
----+--------+----+-------
#   |@CLASS  |id  |name
----+--------+----+-------
0   |null    |1   |SATISH
1   |null    |2   |KRISHNA
2   |null    |3   |KIRAN
3   |null    |4   |JAVEED
4   |null    |5   |RAJA
----+--------+----+-------
Method 4 − Select all records from the Customer table where age is in the range of 25 to 29.
orientdb {db = demo}> SELECT FROM Customer WHERE age in [25,29]
If the above query is executed successfully, you will get the following output.
----+-----+--------+----+-------+----
#   |@RID |@CLASS  |id  |name   |age
----+-----+--------+----+-------+----
0   |#11:0|Customer|1   |satish |25
1   |#11:2|Customer|3   |kiran  |29
2   |#11:4|Customer|5   |raja   |29
----+-----+--------+----+-------+----
Method 5 − Select all records from the Customer table where any field contains the word ‘sh’.
orientdb {db = demo}> SELECT FROM Customer WHERE ANY() LIKE '%sh%'
If the above query is executed successfully, you will get the following output.
----+-----+--------+----+-------+----
#   |@RID |@CLASS  |id  |name   |age
----+-----+--------+----+-------+----
0   |#11:0|Customer|1   |satish |25
1   |#11:1|Customer|2   |krishna|26
----+-----+--------+----+-------+----
Method 6 − Select all records from the Customer table, ordered by age in descending order.
orientdb {db = demo}> SELECT FROM Customer ORDER BY age DESC
If the above query is executed successfully, you will get the following output.
----+-----+--------+----+-------+----
#   |@RID |@CLASS  |id  |name   |age
----+-----+--------+----+-------+----
0   |#11:2|Customer|3   |kiran  |29
1   |#11:4|Customer|5   |raja   |29
2   |#11:1|Customer|2   |krishna|26
3   |#11:0|Customer|1   |satish |25
4   |#11:3|Customer|4   |javeed |21
----+-----+--------+----+-------+----
OrientDB – Load Record
Load Record is used to load a particular record from the schema. Load record will load the record with the help of Record ID. It is represented with @rid symbol in the resultset.
The following statement is the basic syntax of the LOAD Record command.
LOAD RECORD <record-id>
Where <record-id> defines the record id of the record you want to load.
If you don’t know the Record ID of a particular record, then you can execute any query against the table. In the result-set you will find the Record ID (@rid) of the respective record.
Example
Let us consider the same Customer table that we have used in previous chapters.
| Sr.No. | Name | Age |
|---|---|---|
| 1 | Satish | 25 |
| 2 | Krishna | 26 |
| 3 | Kiran | 29 |
| 4 | Javeed | 21 |
| 5 | Raja | 29 |
Try the following query to retrieve the record having Record ID @rid: #11:0.
orientdb {db = demo}> LOAD RECORD #11:0
If the above query is executed successfully, you will get the following output.
+---------------------------------------------------------------------------+
| Document - @class: Customer        @rid: #11:0           @version: 1      |
+---------------------------------------------------------------------------+
|                     Name | Value                                          |
+---------------------------------------------------------------------------+
|                       id | 1                                              |
|                     name | satish                                         |
|                      age | 25                                             |
+---------------------------------------------------------------------------+
OrientDB – Reload Record
Reload Record also works similar to Load Record command and is also used to load a particular record from the schema. Load record will load the record with the help of Record ID. It is represented with @rid symbol in the result-set. The main difference is Reload record ignores the cache which is useful when external concurrent transactions is applied to change the record. It will give the latest update.
The following statement is the basic syntax of the RELOAD Record command.
RELOAD RECORD <record-id>
Where <record-id> defines the record id of the record you want to reload.
If you don’t know the Record ID of a particular record, then you can execute any query against the table. In the result-set you will find the Record ID (@rid) of the respective record.
Example
Let us consider the same Customer table that we have used in the previous chapter.
| Sr.No. | Name | Age |
|---|---|---|
| 1 | Satish | 25 |
| 2 | Krishna | 26 |
| 3 | Kiran | 29 |
| 4 | Javeed | 21 |
| 5 | Raja | 29 |
Try the following query to retrieve the record having Record ID @rid: #11:0.
orientdb {db = demo}> LOAD RECORD #11:0
If the above query is executed successfully, you will get the following output.
+---------------------------------------------------------------------------+
| Document - @class: Customer        @rid: #11:0           @version: 1      |
+---------------------------------------------------------------------------+
|                     Name | Value                                          |
+---------------------------------------------------------------------------+
|                       id | 1                                              |
|                     name | satish                                         |
|                      age | 25                                             |
+---------------------------------------------------------------------------+
OrientDB – Export Record
Export Record is the command used to export the loaded record into the requested and supported format. If you are executing any wrong syntax, it will give the list of supported formats. OrientDB is a family of Document database, therefore JSON is the default supported format.
The following statement is the basic syntax of the Export Record command.
EXPORT RECORD <format>
Where <Format> defines the format you want to get the record.
Note − Export command will export the loaded record based on Record ID.
Example
Let us consider the same Customer table that we have used in the previous chapter.
| Sr.No. | Name | Age |
|---|---|---|
| 1 | Satish | 25 |
| 2 | Krishna | 26 |
| 3 | Kiran | 29 |
| 4 | Javeed | 21 |
| 5 | Raja | 29 |
Try the following query to retrieve the record having Record ID @rid: #11:0.
orientdb {db = demo}> LOAD RECORD #11:0
If the above query is executed successfully, you will get the following output.
+---------------------------------------------------------------------------+
| Document - @class: Customer        @rid: #11:0           @version: 1      |
+---------------------------------------------------------------------------+
|                     Name | Value                                          |
+---------------------------------------------------------------------------+
|                       id | 1                                              |
|                     name | satish                                         |
|                      age | 25                                             |
+---------------------------------------------------------------------------+
Use the following query to export he loaded record (#11:0) into JSON format.
orientdb {db = demo}> EXPORT RECORD json
If the above query is executed successfully, you will get the following output.
{
   "@type": "d",
      "@rid": "#11:0",
   "@version": 1,
   "@class": "Customer",
      "id": 1,
      "name": "satish",
      "age": 25
}
OrientDB – Update Record
Update Record command is used to modify the value of a particular record. SET is the basic command to update a particular field value.
The following statement is the basic syntax of the Update command.
UPDATE <class>|cluster:<cluster>|<recordID>
   [SET|INCREMENT|ADD|REMOVE|PUT <field-name> = <field-value>[,]*] |[CONTENT| MERGE <JSON>]
   [UPSERT]
   [RETURN <returning> [<returning-expression>]]
   [WHERE <conditions>]
   [LOCK default|record]
   [LIMIT <max-records>] [TIMEOUT <timeout>]
Following are the details about the options in the above syntax.
SET − Defines the field to update.
INCREMENT − Increments the specified field value by the given value.
ADD − Adds the new item in the collection fields.
REMOVE − Removes an item from the collection field.
PUT − Puts an entry into map field.
CONTENT − Replaces the record content with JSON document content.
MERGE − Merges the record content with a JSON document.
LOCK − Specifies how to lock the records between load and update. We have two options to specify Default and Record.
UPSERT − Updates a record if it exists or inserts a new record if it doesn’t. It helps in executing a single query in the place of executing two queries.
RETURN − Specifies an expression to return instead of the number of records.
LIMIT − Defines the maximum number of records to update.
TIMEOUT − Defines the time you want to allow the update run before it times out.
Example
Let us consider the same Customer table that we have used in the previous chapter.
| Sr.No. | Name | Age |
|---|---|---|
| 1 | Satish | 25 |
| 2 | Krishna | 26 |
| 3 | Kiran | 29 |
| 4 | Javeed | 21 |
| 5 | Raja | 29 |
Try the following query to update the age of a customer ‘Raja’.
Orientdb {db = demo}> UPDATE Customer SET age = 28 WHERE name = 'Raja'
If the above query is executed successfully, you will get the following output.
Updated 1 record(s) in 0.008000 sec(s).
To check the record of Customer table you can use the following query.
orientdb {db = demo}> SELECT FROM Customer
If the above query is executed successfully, you will get the following output.
----+-----+--------+----+-------+----
#   |@RID |@CLASS  |id  |name   |age
----+-----+--------+----+-------+----
0   |#11:0|Customer|1   |satish |25
1   |#11:1|Customer|2   |krishna|26
2   |#11:2|Customer|3   |kiran  |29
3   |#11:3|Customer|4   |javeed |21
4   |#11:4|Customer|5   |raja   |28
----+-----+--------+----+-------+----
OrientDB – Truncate Record
Truncate Record command is used to delete the values of a particular record.
The following statement is the basic syntax of the Truncate command.
TRUNCATE RECORD <rid>*
Where <rid>* indicates the Record ID to truncate. You can use multiple Rids separated by comma to truncate multiple records. It returns the number of records truncated.
Example
Let us consider the same Customer table that we have used in the previous chapter.
| Sr.No. | Name | Age |
|---|---|---|
| 1 | Satish | 25 |
| 2 | Krishna | 26 |
| 3 | Kiran | 29 |
| 4 | Javeed | 21 |
| 5 | Raja | 28 |
Try the following query to truncate the record having Record ID #11:4.
Orientdb {db = demo}> TRUNCATE RECORD #11:4
If the above query is executed successfully, you will get the following output.
Truncated 1 record(s) in 0.008000 sec(s).
To check the record of Customer table you can use the following query.
Orientdb {db = demo}> SELECT FROM Customer
If the above query is executed successfully, you will get the following output.
----+-----+--------+----+-------+----
#   |@RID |@CLASS  |id  |name   |age
----+-----+--------+----+-------+----
0   |#11:0|Customer|1   |satish |25
1   |#11:1|Customer|2   |krishna|26
2   |#11:2|Customer|3   |kiran  |29
3   |#11:3|Customer|4   |javeed |21
----+-----+--------+----+-------+----
OrientDB – Delete Record
Delete Record command is used to delete one or more records completely from the database.
The following statement is the basic syntax of the Delete command.
DELETE FROM <Class>|cluster:<cluster>|index:<index>
   [LOCK <default|record>]
   [RETURN <returning>]
   [WHERE <Condition>*]
   [LIMIT <MaxRecords>]
   [TIMEOUT <timeout>]
Following are the details about the options in the above syntax.
LOCK − Specifies how to lock the records between load and update. We have two options to specify Default and Record.
RETURN − Specifies an expression to return instead of the number of records.
LIMIT − Defines the maximum number of records to update.
TIMEOUT − Defines the time you want to allow the update run before it times out.
Note − Don’t use DELETE to remove Vertices or Edges because it effects the integrity of the graph.
Example
Let us consider the Customer table.
| Sr.No. | Name | Age |
|---|---|---|
| 1 | Satish | 25 |
| 2 | Krishna | 26 |
| 3 | Kiran | 29 |
| 4 | Javeed | 21 |
Try the following query to delete the record having id = 4.
orientdb {db = demo}> DELETE FROM Customer WHERE id = 4
If the above query is executed successfully, you will get the following output.
Delete 1 record(s) in 0.008000 sec(s).
To check the record of Customer table you can use the following query.
Orientdb {db = demo}> SELECT FROM Customer
If the above query is executed successfully, you will get the following output.
----+-----+--------+----+-------+----
#   |@RID |@CLASS  |id  |name   |age
----+-----+--------+----+-------+----
0   |#11:0|Customer|1   |satish |25
1   |#11:1|Customer|2   |krishna|26
2   |#11:2|Customer|3   |kiran  |29
----+-----+--------+----+-------+----
OrientDB – Create Class
OrientDB supports multi-model feature and provides different ways in approaching and understanding the basic concepts of a database. However, we can easily access these models from the perspective of Document database API. Like RDBMS, OrientDB also uses the Record as an element of storage but it uses the Document type. Documents are stored in the form of Key/Value pairs. We are storing fields and properties as key/value pairs which belong to a concepts class.
Class is a type of data model and the concept is drawn from the Object-oriented programming paradigm. Based on the traditional document database model, data is stored in the form of collection, while in the relational database model data it is stored in tables. OrientDB follows the Document API along with OPPS paradigm. As a concept, class in OrientDB has the closest relationship with the table in relational databases, but (unlike tables) classes can be schema-less, schema-full or mixed. Classes can inherit from other classes, creating trees of classes. Each class has its own cluster or clusters, (created by default, if none are defined).
The following statement is the basic syntax of the Create Class Command.
CREATE CLASS <class>
[EXTENDS <super-class>]
[CLUSTER <cluster-id>*]
[CLUSTERS <total-cluster-number>]
[ABSTRACT]
Following are the details about the options in the above syntax.
<class> − Defines the name of the class you want to create.
<super-class> − Defines the super-class you want to extend with this class.
<total-cluster-number> − Defines the total number of clusters used in this class. Default is 1.
ABSTARCT − Defines the class is abstract. This is optional.
Example
As discussed, class is a concept related to table. Therefore here we will create a table Account. However, while creating class we cannot define fields i.e., properties based on OOPS paradigm.
The following command is to create a class named Account.
orientdb> CREATE CLASS Account
If the above command is executed successfully, you will get the following output.
Class created successfully
You can use the following command to create a class Car which extends to class Vehicle.
orientdb> CREATE CLASS Car EXTENDS Vehicle
If the above command is executed successfully, you will get the following output.
Class created successfully
You can use the following command to create a class Person as abstract.
orientdb> CREATE CLASS Person ABSTRACT
If the above command is executed successfully, you will get the following output.
Class created successfully
Note − Without having properties, the class is useless and unable to build real object. In the further chapters, you can learn how to create properties for a particular class.
OrientDB – Alter Class
Class and Property in OrientDB are used to build a schema with the respective attributes such as class name, super-class, cluster, number of clusters, Abstract, etc. If you want to modify or update any attribute of existing classes in the schema then you have to use Alter Class command.
The following statement is the basic syntax of the Alter Class Command.
ALTER CLASS <class> <attribute-name> <attribute-value>
Following are the details about the options in the above syntax.
<class> − Defines the class name.
<attribute-name> − Defines the attribute you want to change.
<attribute-value> − Defines the value you want to set for the attribute.
The following table defines the list of attributes that support Alter Class command.
| Attribute | Type | Description |
|---|---|---|
| NAME | String | Changes the class name. |
| SHORTNAME | String | Defines a short name, (that is, an alias), for the class. Use NULL to remove a short name assignment. |
| SUPERCLASS | String | Defines a super-class for the class. To add a new class, you can use the syntax +<class>, to remove it use -<class>. |
| OVERSIZE | Decimal number | Defines the oversize factor. |
| ADDCLUSTER | String | Adds a cluster to the class. If the cluster doesn’t exist, it creates a physical cluster. Adding clusters to a class is also useful in storing records in distributed servers. |
| REMOVECLUSTER | String | Removes a cluster from a class. It does not delete the cluster, only removes it from the class. |
| STRICTMODE | – | Enables or disables strict mode. When in strict mode, you work in schema-full mode and cannot add new properties to a record if they are part of the class’ schema definition. |
| CLUSTERSELECTION | – | Defines the selection strategy in choosing which cluster it uses for new records. |
| CUSTOM | – | Defines custom properties. Property names and values must follow the syntax <propertyname>=<value> without spaces between the name and value. |
| ABSTRACT | Boolean | Converts class to an abstract class or the opposite. |
Example
Let us try few examples that will update or modify the attributes of the existing class.
The following query is used to define a super-class ‘Person’ for an existing class ‘Employee’.
orientdb> ALTER CLASS Employee SUPERCLASS Person
If the above query is executed successfully, you will get the following output.
Class altered successfully
The following query is used to add a super-class ‘Person’ for an existing class ‘Employee’.
orientdb> ALTER CLASS Employee SUPERCLASS +Person
If the above query is executed successfully, you will get the following output.
Class altered successfully
OrientDB – Truncate Class
Truncate class will delete all records of clusters defined as part of class. In OrientDB, every class has an associated cluster with the same name. If you want to also remove all records from the class hierarchy, you need to use the POLYMORPHIC keyword.
The following statement is the basic syntax of Truncate Class Command.
TRUNCATE CLASS <class> [ POLYMORPHIC ] [ UNSAFE ]
Following are the details about the options in the above syntax.
<class> − Defines the class you want to truncate.
POLYMORPHIC − Defines whether the command also truncates the hierarchy.
UNSAFE − Defines the command forces truncation on vertex or edge class.
Example
The following query to truncate a class Profile.
orientdb> TRUNCATE CLASS Profile
If the above query is executed successfully, you will get the following output.
Class truncated successfully
OrientDB – Drop Class
The Drop Class command removes a class from the schema. It is important to pay attention and maintain a consistent schema. For example, avoid to remove classes that are super-classes of others. The associated cluster won’t be deleted.
The following statement is the basic syntax of Drop Class command.
DROP CLASS <class>
Drop a class with the class name.
Example
Try the following query to Drop a class Employee.
Orientdb> DROP CLASS Employee
If the above query is executed successfully, you will get the following output.
Class dropped successfully
OrientDB – Create Cluster
Cluster is an important concept in OrientDB which is used to store records, documents, or vertices. In simple words, cluster is a place where a group of records are stored. By default, OrientDB will create one cluster per class. All the records of a class are stored in the same cluster, which has the same name as the class. You can create up to 32,767(2^15-1) clusters in a database.
The CREATE class is a command used to create a cluster with a specific name. Once the cluster is created, you can use the cluster to save records by specifying the name during the creation of any data model. If you want to add a new cluster to a class, use Alter Class command and ADDCLUSTER command.
The following statement is the basic syntax of Create Cluster command.
CREATE CLUSTER <cluster> [ID <cluster-id>]
Where <cluster> defines the name of the cluster you want to create and <cluster-id> defines the numeric ID you want to use for the cluster.
The following table provides the list of Cluster selection strategies.
| Sr.No. | Strategy & Description |
|---|---|
| 1 |
Default Selects the cluster using the class property default ClusterId. |
| 2 |
Round-robin Selects the next cluster in a circular order. It is restarting once complete. |
| 3 |
Balanced Selects the smallest cluster. Allows the class to have all underlying clusters balanced on size. When adding a new cluster to an existing class, it fills the new cluster first. |
Example
Let us take an example to create a cluster named sales.
orientdb> CREATE CLUSTER sales
If the above query is executed successfully, you will get the following output.
Cluster created correctly with id #12
OrientDB – Alter Cluster
Alter Cluster command is to update attributes on an existing cluster. In this chapter you can learn how to add or modify the attributes of a cluster.
The following statement is the basic syntax of Alter Cluster command.
ALTER CLUSTER <cluster> <attribute-name> <attribute-value>
Following are the details about the options in the above syntax.
<cluster> − Defines the cluster name.
<attribute-name> − Defines the attribute you want to change.
<attribute-value> − Defines the value you want to set for this attribute.
The following tabular format provides the list of supported attributes you can use along with Alter cluster command.
| Name | Type | Description |
|---|---|---|
| NAME | String | Changes the cluster name. |
| STATUS | String | Changes the cluster status. Allowed values are ONLINE and OFFLINE. By default, clusters are online. |
| COMPRESSION | String | Defines the compression type to use. Allowed values are NOTHING, SNAPPY, GZIP, and any other compression types registered in the OCompressionFactory class. |
| USE_WAL | Boolean | Defines whether it uses the Journal when OrientDB operates against the cluster |
| RECORD_GROW_FACTO R | Integer | Defines the grow factor to save more space on record creation. You may find this useful when you update the record with additional information. |
| RECORD_OVERFLOW_GR OW_FACTOR | Integer | Defines grow factor on updates. When it reaches the size limit, is uses this setting to get more space, (factor > 1). |
| CONFLICTSTRATEGY | String | Defines the strategy it uses to handle conflicts in the event that OrientDB MVCC finds an update or a delete operation it executes against an old record. |
The following table provides the list of Conflict strategies.
| Sr.No. | Strategy & Description |
|---|---|
| 1 |
Version Throws an exception when versions are different. This is the default setting. |
| 2 |
Content In the event that the versions are different, it checks for changes in the content, otherwise it uses the highest version to avoid throwing an exception. |
| 3 |
Automerge Merges the changes. |
Example
Try the following example queries to learn Alter cluster command.
Execute the following command to change the name of a cluster from Employee to Employee2.
orientdb {db = demo}> ALTER CLUSTER Employee NAME Employee2
If the above command is executed successfully, you will get the following output.
Cluster updated successfully
Execute the following command to change the name of a cluster from Employee2 to Employee using cluster ID.
orientdb {db = demo}> ALTER CLUSTER 12 NAME Employee
If the above command is executed successfully, you will get the following output.
Cluster updated successfully
Execute the following command to change the cluster conflict strategy to automerge.
orientdb {db = demo}> ALTER CLUSTER V CONFICTSTRATEGY automerge
If the above command is executed successfully, you will get the following output.
Cluster updated successfully
OrientDB – Truncate Cluster
The Truncate Cluster command deletes all records of a cluster.
The following statement is the basic syntax of Truncate Cluster Command.
TRUNCATE CLUSTER <cluster-name>
Where <cluster-name> is the name of the cluster.
Example
Try the following query to truncate the cluster named sales.
Orientdb {db = demo}> TRUNCATE CLUSTER Profile
If the above query is executed successfully, you will get the following output.
Cluster truncated successfully.
OrientDB – Drop Cluster
The Drop Cluster command removes the cluster and all its related content. This operation is permanent and rollback.
The following statement is the basic syntax of Drop Cluster command.
DROP CLUSTER <cluster-name>|<cluster-id>
Where <cluster-name> defines the name of the cluster you want to remove and <cluster-id> defines the ID of the cluster you want to remove.
Example
Try the following command to remove Sales cluster.
orientdb> DROP CLUSTER Sales
If the above query is executed successfully, you will get the following output.
Cluster dropped successfully
OrientDB – Create Property
Property in OrientDB works like a field of class and column in the database table. Create Property is a command used to create a property for a particular class. The class name that you used in the command must exist.
The following statement is the basic syntax of Create Property command.
CREATE PROPERTY <class-name>.<property-name> <property-type> [<linked-type>][ <linked-class>]
Following are the details about the options in the above syntax.
<class-name> − Defines the class you want to create the property in.
<property-name> − Defines the logical name of the property.
<property-type> − Defines the type of property you want to create.
<linked-type> − Defines the container type, used in container property type.
<linked-class> − Defines the container class, used in container property type.
The following table provides the data type for property so that OrientDB knows the type of data to store.
| BOOLEAN | INTEGER | SHORT | LONG |
| FLOAT | DATE | STRING | EMBEDDED |
| LINK | BYTE | BINARY | DOUBLE |
In addition to these there are several other property types that work as containers.
| EMBEDDEDLIST | EMBEDDEDSET | EMBEDDEDMAP |
| LINKLIST | LINKSET | LINKMAP |
Example
Try the following example to create a property name on the class Employee, of the String type.
orientdb> CREATE PROPERTY Employee.name STRING
If the above query is executed successfully, you will get the following output.
Property created successfully with id = 1
OrientDB – Alter Property
Alter Property is a command used to modify or update the Property of a particular class. Altering the property means modifying the fields of a table. In this chapter, you can learn how to update the property.
The following statement is the basic syntax of Alter Property Command.
ALTER PROPERTY <class>.<property> <attribute-name> <attribute-value>
Following are the details about the options in the above syntax.
<class> − Defines the class to which the property belongs.
<property> − Defines the property you want to update.
<attribute-name> − Defines the attribute of a property you want to update.
<attribute-value> − Defines the value you want to set on the attribute.
The following table defines the list of attributes to alter the property.
| Attribute | Type | Description |
|---|---|---|
| LINKEDCLASS | String | Defines the linked class name. Use NULL to remove an existing value. |
| LINKEDTYPE | String | Defines the link type. Use NULL to remove an existing value. |
| MIN | Integer | Defines the minimum value as a constraint. Use NULL to remove an existing constraint. |
| MANDATORY | Boolean | Defines whether the property requires a value. |
| MAX | Integer | Defines the maximum value as a constraint. Use NULL to remove an existing constraint. |
| NAME | String | Defines the property name. |
| NOTNULL | Boolean | Defines whether the property can have a NULL value. |
| REGEX | String | Defines a Regular Expression as constraint. Use NULL to remove an existing constraint. |
| TYPE | String | Defines a property type. |
| COLLATE | String | Sets collate to one of the defined comparison strategies. By default, it is set to case-sensitive (cs). You can also set it to case-insensitive (ci). |
| READONLY | Boolean | Defines whether the property value is immutable. That is, if it is possible to change it after the first assignment. Use with DEFAULT to have immutable values on creation. |
| CUSTOM | String | Defines custom properties. The syntax for custom properties is <custom-name> = <custom-value>, such as stereotype = icon. |
| DEFAULT | Defines the default value or function. |
Note − if you are altering NAME or TYPE, this command will take some time to update depending on the amount of data.
Example
Try some queries which are given below to understand Alter property.
Execute the following query to change the name of the property from ‘age’ to ‘born’ in the class Customer.
orinetdb {db = demo}> ALTER PROPERTY Customer.age NAME born
If the above query is executed successfully, you will get the following output.
Property altered successfully
Execute the following query to make ‘name’ as the mandatory property of the class ‘Customer’.
orientdb {db = demo}> ALTER PROPERTY Customer.name MANDATORY TRUE
If the above query is executed successfully, you will get the following output.
Property altered successfully
OrientDB – Drop Property
The Drop property command removes the property from the schema. It does not remove the property values from the record, it just change the schema.
The following statement is the basic syntax of Drop Property Command.
DROP PROPERTY <class>.<property> [FORCE]
Following are the details about the options in the above syntax.
<class> − Defines the class where the property exists.
<property> − Defines the property you want to remove.
[Force] − In case one or more indexes are defined on the property.
Example
Try the following command to remove ‘age’ property from the class ‘Customer’.
orientdb> DROP PROPERTY Customer.age
If the above command is executed successfully, you will get the following output.
Property dropped successfully
OrientDB – Create Vertex
OrientDB database is not only a Document database but also a Graph database. New concepts such as Vertex and Edge are used to store the data in the form of graph. It applies polymorphism on vertices. The base class for Vertex is V.
In this chapter you can learn how to create vertex to store graph data.
The following statement is the basic syntax of Create Vertex Command.
CREATE VERTEX [<class>] [CLUSTER <cluster>] [SET <field> = <expression>[,]*]
Following are the details about the options in the above syntax.
<class> − Defines the class to which the vertex belongs.
<cluster> − Defines the cluster in which it stores the vertex.
<field> − Defines the field you want to set.
<expression> − Defines the express to set for the field.
Example
Try the following example to understand how to create vertex.
Execute the following query to create a vertex without ‘name’ and on the base class V.
orientdb> CREATE VERTEX
If the above query is executed successfully, you will get the following output.
Created vertex 'V#9:0 v1' in 0.118000 sec(s)
Execute the following query to create a new vertex class named v1, then create vertex in that class.
orientdb> CREATE CLASS V1 EXTENDS V
orientdb> CREATE VERTEX V1
If the above query is executed successfully, you will get the following output.
Created vertex 'V1#14:0 v1' in 0.004000 sec(s)
Execute the following query to create a new vertex of the class named v1, defining its properties such as brand = ‘Maruti’ and name = ‘Swift’.
orientdb> CREATE VERTEX V1 SET brand = 'maruti', name = 'swift'
If the above query is executed successfully, you will get the following output.
Created vertex 'V1#14:1{brand:maruti,name:swift} v1' in 0.004000 sec(s)
OrientDB – Move Vertex
Move Vertex command in OrientDB is to move one or more vertices from current location to different class or cluster. If you are applying move command on a particular vertex, then it will update all the edges that are connected to this vertex. If you are specifying a cluster to move vertex, then it moves the vertices to the server owner of the target cluster.
The following statement is the basic syntax of Move Vertex Command.
MOVE VERTEX <source> TO <destination>
[SET [<field>=<value>]* [,]]
[MERGE <JSON>]
[BATCH <batch-size>]
Following are the details about the options in the above syntax.
<source> − Defines the vertex you want to move. It accepts Record ID of a particular vertex or array of Record IDs for vertices.
<destination> − Defines where you want to move the vertex. It supports either class or a cluster as destination.
SET − Sets the values to fields.
MERGE − Sets the values to fields through JSON.
BATCH − Defines the batch size.
Note − This command updates all connected edges, but not links. When using Graph API, it is recommended to use edge connected to vertices.
Example
Try the following examples to learn how to move vertices.
Execute the following query to move a single vertex having Record ID #11:2 from its current position to Class Employee.
orientdb> MOVE VERTEX #11:2 TO CLASS:Employee
If the above query is executed successfully, you will get the following output −
Move vertex command executed with result '[{old:#11:2, new:#13:0}]' in 0.022000 sec(s)
Execute the following query to move set of vertices from the class ‘Customer’ to class ‘Employee’.
orientdb> MOVE VERTEX (SELECT FROM Customer) TO CLASS:Employee
If the above query is executed successfully, you will get the following output.
Move vertex command executed with result '[{old:#11:0,
new:#13:1},{old:#11:1, new:#13:2},{old:#11:2, new:#13:3}]' in 0.011000 sec(s)
OrientDB – Delete Vertex
Delete Vertex command is used to remove vertices from the database. While deleting, it checks and maintains the consistency with the edges and removes all cross-references (with the edges) to the deleted vertex.
The following statement is the basic syntax of Delete Vertex Command.
DELETE VERTEX <vertex> [WHERE <conditions>]
[LIMIT <MaxRecords>>] [BATCH <batch-size>]
Following are the details about the options in the above syntax.
<vertex> − Defines the vertex that you want to remove, using its Class, Record ID, or through a sub-query.
WHERE − Filters condition to determine which records the command removes.
LIMIT − Defines the maximum number of records to be removed.
BATCH − Defines how many records the command removes at a time, allowing you to break large transactions into smaller blocks to save on memory usage.
Example
Try the following command to learn how to delete single vertex or multiple vertices.
Execute the following command to remove the vertex ‘#14:1’.
orientdb> DELETE VERTEX #14:1
If the above command is executed successfully, you will get the following output.
Delete record(s) '1' in 0.005000 sec(s)
Execute the following command to remove all vertices from the class ‘Customer’ marked with the property ‘isSpam’.
orientdb> DELETE VERTEX Customer WHERE isSpam = TRUE
If the above command is executed successfully, you will get the following output.
Delete record(s) '3' in 0.005000 sec(s)
OrientDB – Create Edge
In OrientDB, the concept Edge works like a relation between vertices with the help of some properties. Edges and vertices are the main components of a graph database. It applies polymorphism on Edges. The base class for an Edge is E. While implementing edges, if source or destination vertices are missing or don’t exist, then the transaction will be rollback.
The following statement is the basic syntax of Create Edge Command.
CREATE EDGE <class> [CLUSTER <cluster>] FROM <rid>|(<query>)|[<rid>]* TO <rid>|(<query>)|[<rid>]*
     [SET <field> = <expression>[,]*]|CONTENT {<JSON>}
     [RETRY <retry> [WAIT <pauseBetweenRetriesInMs]] [BATCH <batch-size>]
Following are the details about the options in the above syntax.
<class> − Defines the class name for the edge.
<cluster> − Defines the cluster in which you want to store the edge.
JSON − Provides JSON content to set as the record.
RETRY − Defines the number of retries to attempt in the event of conflict.
WAIT − Defines the time to delay between retries in milliseconds.
BATCH − Defines whether it breaks the command down into smaller blocks and the size of the batches.
Example
Execute the following query to create an edge E between two vertices #9:0 and #14:0.
orientdb> CREATE EDGE FROM #11:4 TO #13:2
If the above query is executed successfully, you will get the following output.
Created edge '[e[#10:0][#9:0->#14:0]]' in 0.012000 sec(s)
Execute the following query to create a new edge type and an edge of new type.
orientdb> CREATE CLASS E1 EXTENDS E
orientdb> CREATE EDGE E1 FROM #10:3 TO #11:4
If the above query is executed successfully, you will get the following output.
Created edge '[e[#10:1][#10:3->#11:4]]' in 0.011000 sec(s)
OrientDB – Update Edge
Update edge command is used to update edge records in the current database. This is equivalent to actual update command in addition to checking and maintaining graph consistency with vertices, in the event that you update the out and in properties.
The following statement is the basic syntax of Update Edge Command.
UPDATE EDGE <edge>
   [SET|INCREMENT|ADD|REMOVE|PUT <field-name> = <field-value> [,]*]|[CONTENT|MERGE <JSON>]
   [RETURN <returning> [<returning-expression>]]
   [WHERE <conditions>]
   [LOCK default|record]
   [LIMIT <max-records>] [TIMEOUT <timeout>]
Following are the details about the options in the above syntax.
<edge> − Defines the edge that you want to update. You can choose between Class that updates edges by class, Cluster that updates edges by cluster, using CLUSTER prefix, or Record ID that updating edges by record ID.
SET − Updates the field to the given values.
INCREMENT − Increments the given field by the value.
ADD − Defines an item to add to a collection of fields.
REMOVE − Defines an item to remove from a collection of fields.
PUT − Defines an entry to put into map fields.
RETURN − Defines the expression you want to return after running the update.
WHERE − Defines the filter condition.
LOCK − Defines how the record locks between the load and updates.
LIMIT − Defines the maximum number of records.
Example
Let us consider an example of updating the edge named ‘address’ in the person class by taking data from the address table having area Id = 001, and the person name = Krishna.
orientdb> UPDATE EDGE address SET out = (SELECT FROM Address WHERE areaID = 001)
WHERE name = 'krishna'
If the above query is executed successfully, you will get the following output.
Updated edge '[address[#10:3][#11:3->#14:2]]' in 0.012000 sec(s)
OrientDB – Delete Edge
Delete edge command is used to remove the database. This is equivalent of the delete command, with the addition of checking and maintaining consistency with vertices by removing all cross-references to the edge from both ‘in’ and ‘out’ vertex properties.
The following statement is the basic syntax of Delete Edge command.
DELETE EDGE
   ( <rid>
      |
      [<rid> (, <rid>)*]
      |
      ( [ FROM (<rid> | <select_statement> ) ] [ TO ( <rid> | <select_statement> ) ] )
      |
      [<class>]
   (
      [WHERE <conditions>]
      [LIMIT <MaxRecords>]
      [BATCH <batch-size>]
   ))
Following are the details about the options in the above syntax.
FROM − Defines the starting point vertex of the edge to delete.
To − Defines the ending point vertex of the edge to delete.
WHERE − Defines the filtering conditions.
LIMIT − Defines the maximum number of edges to delete.
BATCH − Defines the block size for the operation.
Example
Try the following examples to learn how to delete edges.
Execute the following query to delete the edge between two vertices (#11:2, #11:10). But there might be a chance that might exist one or more edges between two vertices. So that we are using the date property for proper functionality. This query will delete the edges which are created on ‘2015-01-15‘ and later.
orientdb {db = demo}> DELETE EDGE FROM #11:2 TO #11:10 WHERE date >= "2012-01-15"
If the above query is executed successfully, you will get the following output.
Delete record(s) '2' in 0.00200 sec(s)
Execute the following query to delete edges starting from the vertex ‘#11:5’ to the vertex ‘#11:10’ and which are related to ‘class = Customer’.
orientdb {db = demo}> DELETE EDGE FROM #11:5 TO #11:10 WHERE @class = 'Customer'
If the above query is executed successfully, you will get the following output.
Delete record(s) '2' in 0.00200 sec(s)
OrientDB – Functions
This chapter explains the complete reference of different types of functions in OrientDB. The following table defines the list of functions, which are categorized by their functionality.
Graph Functions
Try some graph functions along with the following queries.
Execute the following query to get all the outgoing vertices from all the vehicle vertices.
orientdb {db = demo}>SELECT out() from Vehicle
If the above query is executed successfully, you will get the following output.
---+----------+---------
 # | @class   | out
---+----------+---------
 0 | Vehicle  | #11:2
 1 | Vehicle  | #13:1
 2 | Vehicle  | #13:4
---+----------+---------
Execute the following query to get both incoming and outgoing vertices from the vertex #11:3.
orientdb {db = demo}>SELECT both() FROM #11:3
If the above query is executed successfully, you will get the following output.
---+----------+--------+-------
 # | @class   | out    | in
---+----------+--------+-------
 0 | Vehicle  | #13:2  | #10:2
 ---+----------+-------+-------
Math Functions
Try some math functions using the following queries.
Execute the following query to get the sum of salaries of all employees.
orientdb {db = demo}>SELECT SUM(salary) FROM Employee
If the above query is executed successfully, you will get the following output.
---+----------+---------
 # | @CLASS   | sum
---+----------+---------
 0 | null     | 150000
---+----------+---------
Execute the following query to get the average salary of all employees.
orientdb {db = demo}>SELECT avg(salary) FROM Employee
If the above query is executed successfully, you will get the following output.
---+----------+---------
 # | @CLASS   | avg
---+----------+---------
 0 | null     | 25
---+----------+---------
Collections Functions
Try some collection functions using the following queries.
Execute the following query to get a set of teachers, teaching class 9th.
orientdb {db = demo}>SELECT ID, set(teacher.id) AS teacherID from classess where class_id = 9
If the above query is executed successfully, you will get the following output.
---+----------+--------+--------------------------
 # | @CLASS   | id     | TeacherID
---+----------+--------+--------------------------
 0 | null     | 9     |   1201, 1202, 1205, 1208
---+----------+-------+---------------------------
Misc Functions
Try some Misc functions using the following queries.
Execute the following query to learn how to execute if expression.
orientdb {db = demo}> SELECT if(eval("name = 'satish'"), "My name is satish",
"My name is not satish") FROM Employee
If the above query is executed successfully, you will get the following output.
----+--------+-----------------------
#   |@CLASS  | IF
----+--------+-----------------------
0   |null    |My name is satish
1   |null    |My name is not satish
2   |null    |My name is not satish
3   |null    |My name is not satish
4   |null    |My name is not satish
----+--------+------------------------
Execute the following query to get system date.
orientdb {db = demo}> SELECT SYSDATE() FROM Employee
If the above query is executed successfully, you will get the following output.
----+--------+-----------------------
#   |@CLASS  | SYSDATE
----+--------+-----------------------
0   |null    |2016-02-10 12:05:06
1   |null    |2016-02-10 12:05:06
2   |null    |2016-02-10 12:05:06
3   |null    |2016-02-10 12:05:06
4   |null    |2016-02-10 12:05:06
----+--------+------------------------
By using this function thoroughly you can easily manipulate the OrientDB data.
OrientDB – Sequences
Sequences is a concept used in auto increment mechanism and it is introduced in OrientDB v2.2. In database terminology, sequence is a structure that manages the counter field. Simply said sequences are mostly used when you need a number that always increments. It supports two types−
ORDERED − Each time the pointer calls the .next method that returns a new value.
CACHED − The sequence will cache ‘N’ items on each node. To call each item we use .next(), which is preferred when the cache contains more than one item.
Create Sequence
Sequence is usually used to auto increment the id value of a person. Like other SQL concepts of OrientDB it also preforms similar operations as Sequence in RDBMS.
The following statement is the basic syntax to create sequences.
CREATE SEQUENCE <sequence> TYPE <CACHED|ORDERED> [START <start>]
[INCREMENT <increment>] [CACHE <cache>]
Following are the details about the options in the above syntax.
<Sequence> − Local name for sequence.
TYPE − Defines the sequence type ORDERED or CACHED.
START − Defines the initial value.
INCREMENT − Defines the increment for each .next method call.
CACHE − Defines the number of value to pre-cache, in the event that you used to cache sequence type.
Let us create a sequence named ‘seqid’ which starts with number 1201. Try the following queries to implement this example with sequence.
CREATE SEQUENCE seqid START 1201
If the above query is executed successfully, you will get the following output.
Sequence created successfully
Try the following query to use sequence ‘seqid’ to insert the id value of Account table.
INSERT INTO Account SET id = sequence('seqid').next()
If the above query is executed successfully, you will get the following output.
Insert 1 record(s) in 0.001000 sec(s)
Alter Sequence
Alter sequence is a command used to change the properties of a sequence. It will modify all the sequence options except sequence type.
The following statement is the basic syntax to alter sequence.
ALTER SEQUENCE <sequence> [START <start-point>]
[INCREMENT <increment>] [CACHE <cache>]
Following are the details about the options in the above syntax.
<Sequence> − Defines the sequence you want to change.
START − Defines the initial value.
INCREMENT − Defines the increment for each .next method call.
CACHE − Defines the number of value to pre-cache in the event that you used to cache sequence type.
Try the following query to alter the start value from ‘1201 to 1000’ of a sequence named seqid.
ALTER SEQUENCE seqid START 1000
If the above query is executed successfully, you will get the following output.
Altered sequence successfully
Drop Sequence
Drop sequence is a command used to drop a sequence.
The following statement is the basic syntax to drop a sequence.
DROP SEQUENCE <sequence>
Where <Sequence> defines the sequence you want to drop.
Try the following query to drop a sequence named ‘seqid’.
DROP SEQUENCE seqid
If the above query is executed successfully, you will get the following output.
Sequence dropped successfully
OrientDB – Indexes
Index is a pointer which points to a location of data in the database. Indexing is a concept used to quickly locate the data without having to search every record in a database. OrientDB supports four index algorithms and several types within each.
The four types of index are −
SB-Tree Index
It provides a good mix of features available from other index types. Better to use this for general utility. It is durable, transactional and supports range queries. It is default index type. The different type plugins that support this algorithm are −
-
UNIQUE − These indexes do not allow duplicate keys. For composite indexes, this refers to the uniqueness of the composite keys.
-
NOTUNIQUE − These indexes allow duplicate keys.
-
FULLTEXT − These indexes are based on any single word of text. You can use them in queries through the CONTAINSTEXT operator.
-
DICTIONARY − These indexes are similar to those that use UNIQUE, but in the case of duplicate keys, they replace the existing record with the new record.
Hash Index
It performs faster and is very light in disk usage. It is durable, transactional, but does not support range queries. It works like HASHMAP, which makes it faster on punctual lookups and it consumes less resources than other index types. The different type plugins that support this algorithm are −
-
UNIQUE_HASH_INDEX − These indexes do not allow duplicate keys. For composite indexes, this refers to the uniqueness of the composite keys.
-
NOTUNIQUE_HASH_INDEX − These indexes allow duplicate keys.
-
FULLTEXT_HASH_INDEX − These indexes are based on any single word of text. You can use them in queries through the CONTAINSTEXT operator.
-
DICTIONARY_HASH_INDEX − These indexes are similar to those that use UNIQUE_HASH_INDEX, but in cases of duplicate keys, they replace the existing record with the new record.
Lucene Full Text Index
It provides good full-text indexes, but cannot be used to index other types. It is durable, transactional, and supports range queries.
Lucene Spatial Index
It provides good spatial indexes, but cannot be used to index other types. It is durable, transactional, and supports range queries.
Creating Indexes
Create index is a command to create an index on a particular schema.
The following statement is the basic syntax to create an index.
CREATE INDEX <name> [ON <class-name> (prop-names)] <type> [<key-type>]
[METADATA {<metadata>}]
Following are the details about the options in the above syntax.
<name> − Defines the logical name for the index. You can also use the <class.property> notation to create an automatic index bound to a schema property. <class> uses the class of the schema and <property> uses the property created in the class.
<class-name> − Provides the name of the class that you are creating the automatic index to index. This class must exist in the database.
<prop-names> − Provides the list of properties, which you want the automatic index to index. These properties must already exist in schema.
<type> − Provides the algorithm and type of index that you want to create.
<key-type> − Provides the optional key type with automatic indexes.
<metadata> − Provides the JSON representation.
Example
Try the following query to create automatic index bound to the property ‘ID’ of the user sales_user.
orientdb> CREATE INDEX indexforID ON sales_user (id) UNIQUE
If the above query is executed successfully, you will get the following output.
Creating index...
Index created successfully with 4 entries in 0.021000 sec(s)
Querying Indexes
You can use select query to get the records in the index.
Try the following query to retrieve the keys of index named ‘indexforId’.
SELECT FROM INDEX:indexforId
If the above query is executed successfully, you will get the following output.
----+------+----+-----
#   |@CLASS|key |rid
----+------+----+-----
0   |null  |1   |#11:7
1   |null  |2   |#11:6
2   |null  |3   |#11:5
3   |null  |4   |#11:8
----+------+----+-----
Drop Indexes
If you want to drop a particular index, you can use this command. This operation does not remove linked records.
The following statement is the basic syntax to drop an index.
DROP INDEX <name>
Where <name> provides the name of the index you want to drop.
Try the following query to drop an index named ‘ID’ of user sales_user.
DROP INDEX sales_users.Id
If the above query is executed successfully, you will get the following output.
Index dropped successfully
OrientDB – Transactions
Like RDBMS, OrientDB supports transactions ACID properties. A transaction comprises a unit of work performed within a database management system. There are two main reasons to maintain transactions in a database environment.
-
To allow concurrent recovery from failures and keep a database consistent even in case of system failures.
-
To provide isolation between programs accessing a database concurrently.
By default, the database transaction must follow ACID properties such as Atomic, Consistent, Isolated, and Durable properties. But OrientDB is an ACID compliant database, which means it does not contradict or negate the concept ACID, but it changes its perception while handling the NoSQL database. Take a look at how ACID properties work along with NoSQL database.
Atomic − When you do something to change the database the change should work or fail as a whole.
Consistent − The database should remain consistent.
Isolated − If other transaction executions are executing at the same time, then the user will not be able to see the records in concurrent execution.
Durable − If the system crashes (hardware or software), the database itself should be able to take a backup.
Database transaction can be achieved by using Commit and Rollback commands.
Commit
Commit means closing the transaction by saving all changes to the database. Rollback means recover the database state to the point where you opened the transaction.
The following statement is the basic syntax of the COMMIT database command.
COMMIT
Note − You can use this command only after connecting to a particular database and after beginning the transaction.
Example
In this example, we will use the same database named ‘demo’ that we created in an earlier chapter of this tutorial. We will see the operation of commit transaction and store a record using transactions.
You need to first start the transaction using the following BEGIN command.
orientdb {db = demo}> BEGIN
Insert a record into an employee table with the values id = 12 and name = satish.P using the following command.
orientdb> INSERT INTO employee (id, name) VALUES (12, 'satish.P')
You can use the following command to commit the transaction.
orientdb> commit
If this transaction successfully committed, you will get the following output.
Transaction 2 has been committed in 4ms
Rollback
Rollback means recovering the database state to the point where you opened the transaction.
The following statement is the basic syntax of the ROLLBACK database command.
ROLLBACK
Note − You can use this command only after connecting to a particular database and after beginning the transaction.
Example
In this example, we will use the same database named ‘demo’ that we created in an earlier chapter of the tutorial. We will see the operation of rollback transaction and store a record using transactions.
You have to first start the transaction using the following BEGIN command.
orientdb {db = demo}> BEGIN
Insert a record into an employee table with the values id = 12 and name = satish.P using the following command.
orientdb> INSERT INTO employee (id, name) VALUES (12, 'satish.P')
You can use the following command to retrieve the records of the table employee.
orientdb> SELECT FROM employee WHERE name LIKE '%.P'
If this command is executed successfully, you will get the following output.
---+-------+--------------------
 # | ID   | name
---+-------+--------------------
 0 | 12   | satish.P
---+-------+--------------------
1 item(s) found. Query executed in 0.076 sec(s).
You can use the following command to Rollback this transaction.
orientdb> ROLLBACK
Check the select query again to retrieve the same record from the Employee table.
orientdb> SELECT FROM employee WHERE name LIKE '%.P'
If the Rollback is executed successfully, you will get 0 records found in the output.
0 item(s) found. Query executed in 0.037 sec(s).
OrientDB – Hooks
OrientDB Hooks are nothing but triggers in the database terminology that enable internal events before and after each CRUD operations in the user applications. You can use hooks to write custom validation rules, to enforce security, or to arrange external events like replicating against a relational DBMS.
OrientDB supports two kinds of hooks −
Dynamic Hook − Triggers, which can be built at class level and/or Document level.
Java (Native) Hook − Triggers, which can be built using Java classes.
Dynamic Hooks
Dynamic hooks are more flexible than Java hooks, because they can be changed at runtime and can run per document if needed, but are slower than Java hooks.
To execute hooks against your documents, first allow your classes to extend OTriggered base class. Later, define a custom property for the interested event. Following are the available events.
-
onBeforeCreate − Called before creating a new document.
-
onAfterCreate − Called after creating a new document.
-
onBeforeRead − Called before reading a document.
-
onAfterRead − Called after reading a document.
-
onBeforeUpdate − Called before updating a document.
-
onAfterUpdate − Called after updating a document.
-
onBeforeDelete − Called before deleting a document.
-
onAfterDelete − Called after deleting a document.
Dynamic Hooks can call −
-
Functions, written in SQL, Javascript or any language supported by OrientDB and JVM.
-
Java static methods.
Class Level Hooks
Class level hooks are defined for all the documents that relate to a class. Following is an example to set up a hook that acts at class level against Invoice documents.
CREATE CLASS Invoice EXTENDS OTriggered
ALTER CLASS Invoice CUSTOM onAfterCreate = invoiceCreated
Let’s create the function invoiceCreated in Javascript that prints in the server console the invoice number created.
CREATE FUNCTION invoiceCreated "print('nInvoice created: ' + doc.field ('number'));"
LANGUAGE Javascript
Now try the hook by creating a new Invoice document.
INSERT INTO Invoice CONTENT {number: 100, notes: 'This is a test}
If this command is executed successfully, you will get the following output.
Invoice created: 100
Document Level Hook
You can define a special action only against one or more documents. To do this, allow your class to extend OTriggered class.
For example let us execute a trigger, as Javascript function, against an existent Profile class, for all the documents with property account = ‘Premium’. The trigger will be called to prevent deletion of documents.
ALTER CLASS Profile SUPERCLASS OTriggered UPDATE Profile
SET onBeforeDelete = 'preventDeletion' WHERE account = 'Premium'
Let’s create the preventDeletion() Javascript function.
CREATE FUNCTION preventDeletion "throw new java.lang.RuntimeException('Cannot
delete Premium profile ' + doc)" LANGUAGE Javascript
And then test the hook by trying to delete a ‘Premium’ account.
DELETE FROM #12:1
java.lang.RuntimeException: Cannot delete Premium profile
profile#12:1{onBeforeDelete:preventDeletion,account:Premium,name:Jill} v-1
(<Unknown source>#2) in <Unknown source> at line number 2
JAVA Hooks
One common use case for OrientDB Hooks (triggers) is to manage created and updated dates for any or all classes. For example, you can set a CreatedDate field whenever a record is created and set an UpdatedDate field whenever a record is updated, and do it in a way where you implement the logic once at the database layer and never have to worry about it again at the application layer.
Before creating, you will have to download orientdb-core.jar file by visit the following link download OrientDB core. And later copy that jar file into the folder where you want to store the Java source file.
Create Hook File
Create a Java file named HookTest.java, which will test the Hook mechanism using Java language.
import java.io.BufferedReader;
import java.io.FileNotFoundException;
import java.io.InputStream;
import java.io.InputStreamReader;
import java.io.StringReader;
import java.util.ArrayList;
import java.util.List;
import java.util.concurrent.locks.ReentrantLock;
import com.orientechnologies.orient.core.hook.ODocumentHookAbstract;
import com.orientechnologies.orient.core.hook.ORecordHook;
import com.orientechnologies.orient.core.hook.ORecordHookAbstract;
import com.orientechnologies.orient.core.db.ODatabaseLifecycleListener;
import com.orientechnologies.orient.core.db.ODatabase;
import com.orientechnologies.orient.core.record.ORecord;
import com.orientechnologies.orient.core.record.impl.ODocument;

public class HookTest extends ODocumentHookAbstract implements ORecordHook {
   public HookTest() {

   }

   @Override
   public DISTRIBUTED_EXECUTION_MODE getDistributedExecutionMode() {
      return DISTRIBUTED_EXECUTION_MODE.BOTH;
   }
   public RESULT onRecordBeforeCreate( ODocument iDocument ) {
      System.out.println("Ran create hook");
      return ORecordHook.RESULT.RECORD_NOT_CHANGED;
   }
   public RESULT onRecordBeforeUpdate( ODocument iDocument ) {
      System.out.println("Ran update hook");
      return ORecordHook.RESULT.RECORD_NOT_CHANGED;
   }
}
The above sample code prints the appropriate comment every time you create or update a record of that class.
Let’s add one more hook file setCreatedUpdatedDates.java as follows −
import java.io.BufferedReader;
import java.io.FileNotFoundException;
import java.io.InputStream;
import java.io.InputStreamReader;
import java.io.StringReader;
import java.util.ArrayList;
import java.util.List;
import java.util.concurrent.locks.ReentrantLock;
import com.orientechnologies.orient.core.hook.ODocumentHookAbstract;
import com.orientechnologies.orient.core.hook.ORecordHook;
import com.orientechnologies.orient.core.hook.ORecordHookAbstract;
import com.orientechnologies.orient.core.db.ODatabaseLifecycleListener;
import com.orientechnologies.orient.core.db.ODatabase;
import com.orientechnologies.orient.core.record.ORecord;
import com.orientechnologies.orient.core.record.impl.ODocument;

public class setCreatedUpdatedDates extends ODocumentHookAbstract implements ORecordHook {
   public setCreatedUpdatedDates() {

   }

   @Override
   public DISTRIBUTED_EXECUTION_MODE getDistributedExecutionMode() {
      return DISTRIBUTED_EXECUTION_MODE.BOTH;
   }
   public RESULT onRecordBeforeCreate( ODocument iDocument ) {
      if ((iDocument.getClassName().charAt(0) == 't') || (iDocument.getClassName().charAt(0)=='r')) {
         iDocument.field("CreatedDate", System.currentTimeMillis() / 1000l);
         iDocument.field("UpdatedDate", System.currentTimeMillis() / 1000l);
         return ORecordHook.RESULT.RECORD_CHANGED;
      } else {
         return ORecordHook.RESULT.RECORD_NOT_CHANGED;
      }
   }

   public RESULT onRecordBeforeUpdate( ODocument iDocument ) {
      if ((iDocument.getClassName().charAt(0) == 't') || (iDocument.getClassName().charAt(0)=='r')) {
         iDocument.field("UpdatedDate", System.currentTimeMillis() / 1000l);
         return ORecordHook.RESULT.RECORD_CHANGED;
      } else {
         return ORecordHook.RESULT.RECORD_NOT_CHANGED;
      }
   }
}
What the above code does is look for any class that starts with the letters ‘r’ or ‘t’ and sets CreatedDate and UpdatedDate when the record gets created and sets just UpdatedDate every time the record gets updated.
Compile Java Hooks
Compile Java code by using the following command. Note: Keep the downloaded jar file and these Java files into the same folder.
$ jar cf hooks-1.0-SNAPSHOT.jar *.java
Move Compiled Code to Where OrientDB Server Can Find It
You need to copy the finished .jar file to the directory where your OrientDB server will look for them. This means the ‘./lib’ folder under your OrientDB Server root directory will look like this −
$ cp hooks-1.0-SNAPSHOT.jar "$ORIENTDB_HOME/lib"
Enable Test Hook in the OrientDB Server Configuration File
Edit $ORIENTDB_HOME/config/orientdb-server-config.xml and add the following section near the end of the file.
   <hooks>
      <hook class = "HookTest" position = "REGULAR"/>
   </hooks>
   ...
</orient-server>
Restart OrientDB Server
Once you restart OrientDB Server, the hook you defined in orientdb-server-config.xml is now active. Launch an OrientDB console, connect it to your database, and run the following command −
INSERT INTO V SET ID = 1;
If this command is executed successfully, you will get the following output.
Ran create hook
Now run the following command −
UPDATE V SET ID = 2 WHERE ID = 1;
If this command is executed successfully, you will get the following output.
Ran update hook
Enable Real Hook in the OrientDB Server Configuration File
Edit $ORIENTDB_HOME/config/orientdb-server-config.xml and change the hooks section as follows −
   <hooks>
      <hook class="setCreatedUpdatedDates" position="REGULAR"/>
   </hooks>
   ...
</orient-server>
Restart OrientDB Server
Create a new class that starts with the letter ‘r’ or ‘t’ −
CREATE CLASS tTest EXTENDS V;
Now insert a record −
INSERT INTO tTest SET ID = 1
SELECT FROM tTest
If this command is executed successfully, you will get the following output.
----+-----+------+----+-----------+-----------
#   |@RID |@CLASS|ID  |CreatedDate|UpdatedDate
----+-----+------+----+-----------+-----------
0   |#19:0|tTest |1   |1427597275 |1427597275
----+-----+------+----+-----------+-----------
Even though you did not specify values to set for CreatedDate and UpdatedDate, OrientDB has set these fields automatically for you.
Next you need to update the record using the following command −
UPDATE tTest SET ID = 2 WHERE ID = 1;
SELECT FROM tTest;
If this command is executed successfully, you will get the following output.
----+-----+------+----+-----------+-----------
#   |@RID |@CLASS|ID  |CreatedDate|UpdatedDate
----+-----+------+----+-----------+-----------
0   |#19:0|tTest |2   |1427597275 |1427597306
----+-----+------+----+-----------+-----------
You can see that OrientDB has changed the UpdatedDate but has let the CreatedDate remain unchanged.
OrientDB Java Hooks can be an extremely valuable tool to help automate work you would otherwise have to do in application code. As many DBAs are not always Java experts, hopefully the information contained in this tutorial will give you a head start and make you feel comfortable with the technology, empowering you to successfully create database triggers as the need arises.
OrientDB – Caching
Caching is a concept that will create a copy of the database table structure providing a comfortable environment for the user applications. OrientDB has several caching mechanisms at different levels.
The following illustration gives an idea about what caching is.

In the above illustration DB1, DB2, DB3 are the three different database instances used in an application.
Level-1 cache is a Local cache which stores all the entities known by a specific session. If you have three transactions in this session, it will hold all entities used by all three transactions. This cache gets cleared when you close the session or when you perform the “clear” method. It reduces the burden of the I/O operations between the application and the database and in turn increases the performance.
Level-2 cache is a Real cache that works by using third party provider. You can have full control over the contents of the cache, i.e. you will be able to specify which entries should be removed, which ones should be stored longer and so on. It is a full shared cache among multiple threads.
Storage model is nothing but storage device that is disk, memory, or remote server.
How Cache Works in OrientDB?
OrientDB caching provides different methodologies in different environments. Caching is mainly used for faster database transactions, reducing the processing time of a transaction and increasing the performance. The following flow diagrams show how caching works in local mode and client-server mode.
Local Mode (Embedded Database)
The following flow diagram tells you how the record is in-between storage and used application in the local mode i.e., when your database server is in your localhost.

When the client application asks for a record OrientDB checks for the following −
-
If a transaction has begun, then it searches inside the transaction for changed records and returns it if found.
-
If the local cache is enabled and contains the requested record, then returns it.
-
If at this point the record is not in cache, then asks for it to the Storage (disk, memory).
Client Server Mode (Remote Database)
The following flow diagram tells you how the record is in-between storage and used application in the client-server mode i.e., when your database server is in remote location.
When the client application asks for a record, OrientDB checks for the following −
-
If a transaction has begun, then it searches inside the transaction for changed records and returns it if found.
-
If the local cache is enabled and contains the requested record, then returns it.
-
At this point, if the record is not in cache, then asks for it to the Server through a TCP/IP call.
-
In the server, if the local cache is enabled and contains the requested record, then returns it.
-
At this point, still the record is not cached in the server, then asks for it to the Storage (disk, memory).
OrientDB – Logging
OrientDB uses the Java Logging framework bundled with Java Virtual Machine. OrientDB’s default log format is managed by OLogFormatter class.
The following statement is the basic syntax of logging command.
<date> <level> <message> [<requester>]
Following are the details about the options in the above syntax.
<date> − It is the log date in the following format: yyyy-MM-dd HH:mm:ss:SSS.
<level> − It is the logging level as 5 chars output.
<message> − It is the text of log, it can be of any size.
[<class>] − It is the Java class that is logged (optional).
Supported levels are those contained in the JRE class java.util.logging.Level. They are −
- SEVERE (highest value)
- WARNING
- INFO
- CONFIG
- FINE
- FINER
- FINEST (lowest value)
By default, two loggers are installed −
-
Console, as the output of the shell/command prompt that starts the application/server. Can be changed by setting the variable ‘log.console.level’.
-
File, as the output to the log files. Can be changed by setting the ‘log.file.level’.
Configure Logging
The logging strategies and policies can be configured using a file following the Java.
syntax − Java Logging configuration.
Example
Copy the following content from orientdb-server-log.properties file and put it in the $ORIENTDB_HOME/config file.
# Specify the handlers to create in the root logger
# (all loggers are children of the root logger)
# The following creates two handlers
handlers = java.util.logging.ConsoleHandler, java.util.logging.FileHandler
# Set the default logging level for the root logger
.level = ALL

# Set the default logging level for new ConsoleHandler instances
java.util.logging.ConsoleHandler.level = INFO
# Set the default formatter for new ConsoleHandler instances
java.util.logging.ConsoleHandler.formatter =
   com.orientechnologies.common.log.OLogFormatter

# Set the default logging level for new FileHandler instances
java.util.logging.FileHandler.level = INFO
# Naming style for the output file
java.util.logging.FileHandler.pattern =../log/orient-server.log
# Set the default formatter for new FileHandler instances
java.util.logging.FileHandler.formatter = com.orientechnologies.common.log.OLogFormatter
# Limiting size of output file in bytes:
java.util.logging.FileHandler.limit = 10000000
# Number of output files to cycle through, by appending an
# integer to the base file name:
java.util.logging.FileHandler.count = 10
To tell the JVM where the properties file is placed, you need to set the “java.util.logging.config.file” system property to it. For example, use the following command −
$ java -Djava.util.logging.config.file=mylog.properties ...
Set the logging level
To change the logging level without modifying the logging configuration, just set the “log.console.level” and “log.file.level” system variables to the requested levels.
Logging at Startup
Following are the procedures to set logging at startup level in different ways.
In the Server Configuration
Open the file orientdb-server-config.xml and add or update these lines at the end of the file inside the <properties> section −
<entry value = "fine" name = "log.console.level" />
<entry value = "fine" name = "log.file.level" />
In Server.sh (or .bat) Script
Set the system property “log.console.level” and “log.file.level” to the levels you want using the -D parameter of java.
$ java -Dlog.console.level = FINE ...
Logging at Run-time
Following are the procedures to set logging at startup level in different ways.
By Using Java Code
The system variable can be set at startup using the System.setProperty() API. The following code snippet is the syntax to set logging level using Java code.
public void main(String[] args){
   System.setProperty("log.console.level", "FINE");
   ...
}
On Remote Server
Execute a HTTP POST against the URL: /server/log.<type>/<level>, where −
- <type> can be “console” or “file”
- <level> is one of the supported levels
Example
The following example uses cURL to execute a HTTP POST command against OrientDB Server. Server’s “root” user and password were used, replace with your own password.
Enable the finest tracing level to console −
curl -u root:root -X POST http://localhost:2480/server/log.console/FINEST
Enable the finest tracing level to file −
curl -u root:root -X POST http://localhost:2480/server/log.file/FINEST
OrientDB – Performance Tuning
In this chapter, you can get some general tips on how to optimize your application that uses OrientDB. There are three ways to increase the performance for different types of database.
-
Document Database Performance Tuning − It uses a technique that helps avoid document creation for every new document.
-
Object Database Performance Tuning − It uses the generic techniques to improve performance.
-
Distributed Configuration Tuning − It uses different methodologies to improve performance in distributed configuration.
You can achieve generic performance tuning by changing the Memory, JVM, and Remote connection settings.
Memory Settings
There are different strategies in memory setting to improve performance.
Server and Embedded Settings
These settings are valid for both Server component and the JVM where the Java application is run using OrientDB in Embedded mode, by directly using plocal.
The most important thing on tuning is assuring the memory settings are correct. What can make a real difference is the right balancing between the heap and the virtual memory used by Memory Mapping, especially on large datasets (GBs, TBs and more) where the inmemory cache structures count less than raw IO.
For example, if you can assign maximum 8GB to the Java process, it’s usually better assigning small heap and large disk cache buffer (off-heap memory).
Try the following command to increase the heap memory.
java -Xmx800m -Dstorage.diskCache.bufferSize=7200 ...
The storage.diskCache.bufferSize setting (with old “local” storage it was file.mmap.maxMemory) is in MB and tells how much memory to use for Disk Cache component. By default it is 4GB.
NOTE − If the sum of maximum heap and disk cache buffer is too high, it could cause the OS to swap with huge slowdown.
JVM Settings
JVM settings are encoded in server.sh (and server.bat) batch files. You can change them to tune the JVM according to your usage and hw/sw settings. Add the following line in server.bat file.
-server -XX:+PerfDisableSharedMem
This setting will disable writing debug information about the JVM. In case you need to profile the JVM, just remove this setting.
Remote Connections
There are many ways to improve performance when you access the database using a remote connection.
Fetching Strategy
When you work with a remote database you have to pay attention to the fetching strategy used. By default, OrientDB client loads only the record contained in the resultset. For example, if a query returns 100 elements, but if you cross these elements from the client, then OrientDB client lazily loads the elements with one more network call to the server for each missed record.
Network Connection Pool
Each client, by default, uses only one network connection to talk with the server. Multiple threads on the same client share the same network connection pool.
When you have multiple threads, there could be a bottleneck since a lot of time is spent waiting for a free network connection. This is the reason why it is important to configure the network connection pool.
The configuration is very simple, just 2 parameters −
-
minPool − It is the initial size of the connection pool. The default value is configured as global parameters “client.channel.minPool”.
-
maxPool − It is the maximum size the connection pool can reach. The default value is configured as global parameters “client.channel.maxPool”.
If all the pool connections are busy, then the client thread will wait for the first free connection.
Example command of configuration by using database properties.
database = new ODatabaseDocumentTx("remote:localhost/demo");
database.setProperty("minPool", 2);
database.setProperty("maxPool", 5);

database.open("admin", "admin");
Distributed Configuration Tuning
There are many ways to improve performance on distributed configuration.
Use Transactions
Even when you update graphs, you should always work in transactions. OrientDB allows you to work outside of them. Common cases are read-only queries or massive and nonconcurrent operations can be restored in case of failure. When you run on distributed configuration, using transactions helps to reduce latency. This is because the distributed operation happens only at commit time. Distributing one big operation is much efficient than transferring small multiple operations, because of the latency.
Replication vs Sharding
OrientDB distributed configuration is set to full replication. Having multiple nodes with the same copy of database is important for scale reads. In fact, each server is independent on executing reads and queries. If you have 10 server nodes, the read throughput is 10x.
With writes, it’s the opposite: having multiple nodes with full replication slows down the operations, if the replication is synchronous. In this case, sharding the database across multiple nodes allows you to scale up writes, because only a subset of nodes are involved on write. Furthermore, you could have a database bigger than one server node HD.
Scale up on Writes
If you have a slow network and you have a synchronous (default) replication, you could pay the cost of latency. In fact when OrientDB runs synchronously, it waits at least for the writeQuorum. This means that if the writeQuorum is 3, and you have 5 nodes, the coordinator server node (where the distributed operation is started) has to wait for the answer from at least 3 nodes in order to provide the answer to the client.
In order to maintain the consistency, the writeQuorum should be set to the majority. If you have 5 nodes the majority is 3. With 4 nodes, it is still 3. Setting the writeQuorum to 3 instead of 4 or 5 allows to reduce the latency cost and still maintain the consistency.
Asynchronous Replication
To speed things up, you can set up Asynchronous Replication to remove the latency bottleneck. In this case, the coordinator server node executes the operation locally and gives the answer to the client. The entire replication will be in the background. In case the quorum is not reached, the changes will be rolled back transparently.
Scale up on Reads
If you already set the writeQuorum to the majority of nodes, you can leave the readQuorum to 1 (the default). This speeds up all the reads.
OrientDB – Upgrading
While upgrading, you have to consider the version number and the format. There are three types of formats – MAJOR, MINOR, PATCH.
-
MAJOR version entails incompatible API changes.
-
MINOR version entails functionality in a backward-compatible manner.
-
PTCH version entails backward-compatible bug fixes.
To synchronize between minor and major versions, you may need to export and import the databases. Sometimes you many need to migrate the database from LOCAL to PLOCAL and need to migrate the graph to RidBag.
Migrate from LOCAL Storage Engine to PLOCAL
Starting from version 1.5.x OrientDB comes with a brand new storage engine: PLOCAL (Paginated LOCAL). It’s persistent like the LOCAL, but stores information in a different way. Following points show the comparison between PLOCAL and LOCAL −
-
In PLOCAL Records are stored in cluster files, while with LOCAL was split between cluster and data-segments.
-
PLOCAL is more durable than LOCAL because of the append-on-write mode.
-
PLOCAL has minor contention locks on writes, which means more concurrency.
-
PLOCAL doesn’t use Memory Mapping techniques (MMap) so the behavior is more “predictable”.
To migrate your LOCAL storage to the new PLOCAL, you need to export and re-import the database using PLOCAL as storage engine. Following is the procedure.
Step 1 − Open a new shell (Linux/Mac) or a Command Prompt (Windows).
Step 2 − Export the database using the console. Follow the given command to export database demo into demo.json.gzip file.
$ bin/console.sh (or bin/console.bat under Windows)
orientdb> CONNECT DATABASE local:/temp/demo admin admin
orientdb> EXPORT DATABASE /temp/demo.json.gzip
orientdb> DISCONNECT
Step 3 − On a local filesystem, create a new database using the “plocal” engine −
orientdb> CREATE DATABASE plocal:/temp/newdb admin admin plocal graph
Step 4 − Import the old database to the new one.
orientdb> IMPORT DATABASE /temp/demo.json.gzip -preserveClusterIDs=true
orientdb> QUIT
If you access the database in the same JVM, remember to change the URL from “local:” to “plocal:”
Migrate Graph to RidBag
As of OrientDB 1.7, the RidBag is a default collection that manages adjacency relations in graphs. While the older database managed by an MVRB-Tree are fully compatible, you can update your database to the more recent format.
You can upgrade your graph via console or using the ORidBagMigration class.
-
Connect to database CONNECT plocal:databases/<graphdb-name>
-
Run upgrade graph command
OrientDB – Security
Like RDBMS, OrientDB also provides security based on well-known concepts, users, and roles. Each database has its own users and each user has one or more roles. Roles are the combination of working modes and set of permissions.
Users
By default OrientDB maintains three different users for all database in the server −
-
Admin − This user has access to all functions on the database without limitation.
-
Reader − This user is a read-only user. The reader can query any records in the database, but can’t modify or delete them. It has no access to internal information, such as the users and roles themselves.
-
Writer − This user is the same as the user reader, but it can also create, update, and delete records.
Working with Users
When you are connected to a database, you can query the current users on the database by using SELECT queries on the OUser class.
orientdb> SELECT RID, name, status FROM OUser
If the above query is executed successfully, you will get the following output.
---+--------+--------+--------
#  | @CLASS | name   | status
---+--------+--------+--------
0  | null   | admin  | ACTIVE
1  | null   | reader | ACTIVE
2  | null   | writer | ACTIVE
---+--------+--------+--------
3 item(s) found. Query executed in 0.005 sec(s).
Creating a New User
To create a new user, use the INSERT command. Remember, in doing so, you must set the status to ACTIVE and give it a valid role.
orientdb> INSERT INTO OUser SET
               name = 'jay',
               password = 'JaY',
               status = 'ACTIVE',
               roles = (SELECT FROM ORole WHERE name = 'reader')
Updating Users
You can change the name for the user with the UPDATE statement.
orientdb> UPDATE OUser SET name = 'jay' WHERE name = 'reader'
In the same way, you can also change the password for the user.
orientdb> UPDATE OUser SET password = 'hello' WHERE name = 'reader'
OrientDB saves the password in a hash format. The trigger OUserTrigger encrypts the password transparently before it saves the record.
Disabling Users
To disable a user, use UPDATE to switch its status from ACTIVE to SUSPENDED. For instance, if you want to disable all users except for admin, use the following command −
orientdb> UPDATE OUser SET status = 'SUSPENDED' WHERE name <> 'admin'
Roles
A role determines what operations a user can perform against a resource. Mainly, this decision depends on the working mode and the rules. The rules themselves work differently, depending on the working mode.
Working with Roles
When you are connected to a database, you can query the current roles on the database using SELECT queries on the ORole class.
orientdb> SELECT RID, mode, name, rules FROM ORole
If the above query is executed successfully, you will get the following output.
--+------+----+--------+-------------------------------------------------------
# |@CLASS|mode| name   | rules
--+------+----+--------+-------------------------------------------------------
0 | null | 1  | admin  | {database.bypassRestricted = 15}
1 | null | 0  | reader | {database.cluster.internal = 2, database.cluster.orole = 0...
2 | null | 0  | writer | {database.cluster.internal = 2, database.cluster.orole = 0...
--+------+----+--------+-------------------------------------------------------
3 item(s) found.  Query executed in 0.002 sec(s).
Creating New Roles
To create a new role, use the INSERT statement.
orientdb> INSERT INTO ORole SET name = 'developer', mode = 0
Working with Modes
Where rules determine what users belonging to certain roles can do on the databases, working modes determine how OrientDB interprets these rules. There are two types of working modes, designated by 1 and 0.
-
Allow All But (Rules) − By default it is the super user mode. Specify exceptions to this using the rules. If OrientDB finds no rules for a requested resource, then it allows the user to execute the operation. Use this mode mainly for power users and administrators. The default role admin uses this mode by default and has no exception rules. It is written as 1 in the database.
-
Deny All But (Rules) − By default this mode allows nothing. Specify exceptions to this using the rules. If OrientDB finds rules for a requested resource, then it allows the user to execute the operation. Use this mode as the default for all classic users. The default roles, reader and writer, use this mode. It is written as 0 in the database.
OrientDB – Studio
OrientDB provides a web UI to carry out database operations through GUI. This chapter explains the different options available in OrientDB.
Studio Homepage
Studio is a web interface for the administration of OrientDB that comes in bundle with the OrientDB distribution.
First, you need to start the OrientDB server using the following command.
$ server.sh
If you run OrientDB in your machine, the web interface can be accessed via the URL −
http://localhost:2480
If the command is executed successfully, following will be the output on screen.

Connect to an Existing Database
To login, select a database from the databases list and use any database user. By default (username/password) reader/reader can read records from the database, writer/writer can read, create, update and delete records, while admin/admin has all rights.
Drop an Existing Database
Select a database from the databases list and click the trash icon. Studio will open a confirmation popup where you have to insert the Server User and Server Password.
Then click the “Drop database” button. You can find the server credentials in the $ORIENTDB_HOME/config/orientdb-server-config.xml file.
<users>
   <user name = "root" password = "pwd" resources = "*" />
</users>
Create a New Database
To create a new database, click the “New DB” button from the homepage.
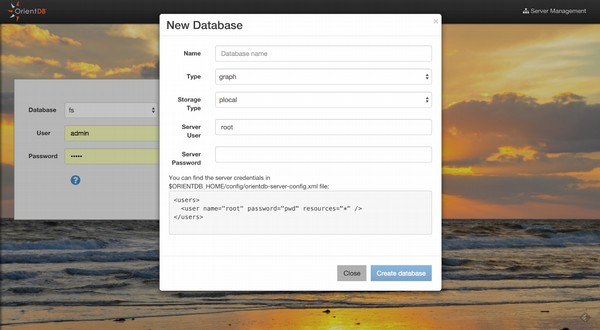
Following information is needed to create a new database −
- Database name
- Database type (Document/Graph)
- Storage type (plocal/memory)
- Server user
- Server password
You can find the server credentials in the $ORIENTDB_HOME/config/orientdbserver-config.xml file.
<users>
   <user name = "root" password = "pwd" resources = "*" />
</users>
Once created, Studio will automatically login to the new database.
Execute a Query
Studio supports auto recognition of the language you’re using between those supported: SQL and Gremlin. While writing, use the auto-complete feature by pressing Ctrl + Space.
The following shortcuts are available in the query editor −
-
Ctrl + Return − To execute the query or just click the Run button.
-
Ctrl/Cmd + Z − To undo changes.
-
Ctrl/Cmd + Shift + Z − To redo changes.
-
Ctrl/Cmd + F − To search in the editor.
-
Ctrl/Cmd + / − To toggle a comment.
The following screenshot shows how to execute a query.
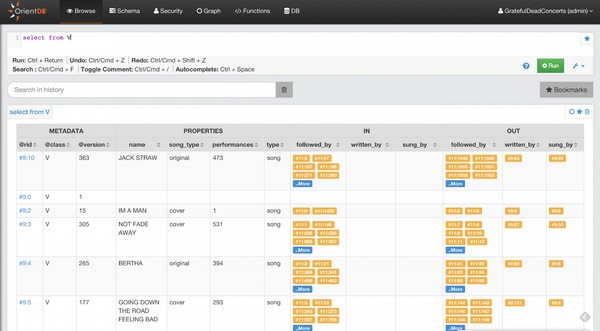
By clicking any @rid value in the result-set, you will go into document edit mode if the record is a Document, otherwise you will go into vertex edit.
You can bookmark your queries by clicking the star icon in the results-set or in the editor. To browse bookmarked queries, click the Bookmarks button. Studio will open the bookmarks list on the left, where you can edit/delete or rerun queries.
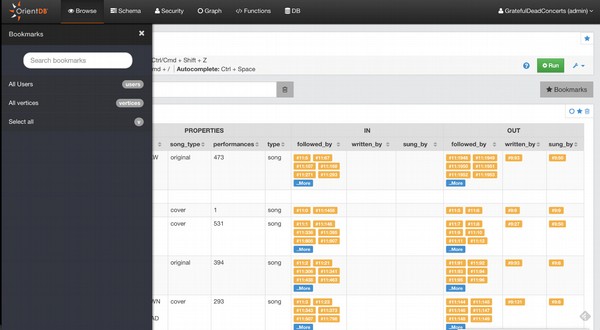
Studio saves the executed queries in the Local Storage of the browser. In the query settings, you can configure how many queries studio will keep in history. You can also search a previously executed query, delete all the queries from the history, or delete a single query.
Edit Vertex
To edit the vertex of the graph, go to the Graph section. Then run the following query.
Select From Customer
On successfully running the query, following be the output screenshot. Select the particular vertex in the graph canvas to edit.
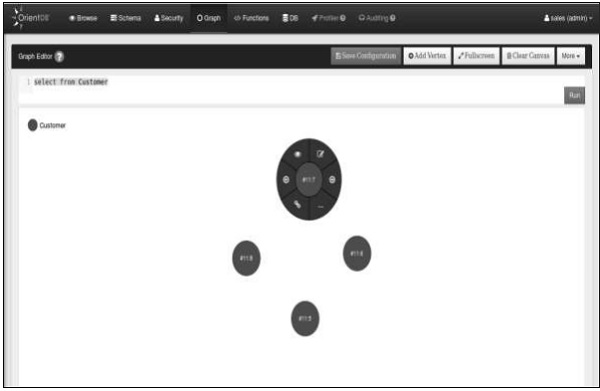
Select the edit symbol on the particular vertex. You will get the following screen which contains the options to edit the vertex.
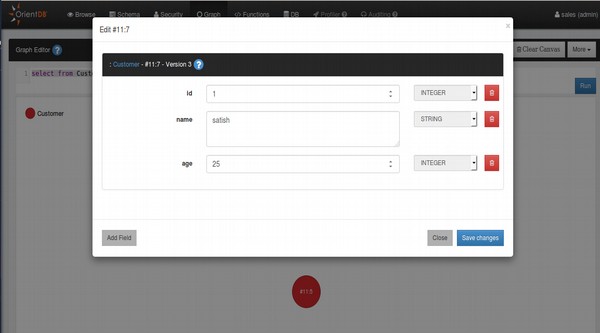
Schema Manager
OrientDB can work in schema-less mode, schema mode or a mix of both. Here we’ll discuss the schema mode. Click on the Schema section on the top of web UI. You will get the following screenshot.
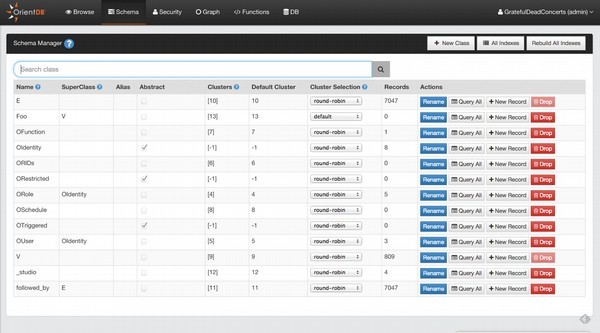
Create a New Class
To create a new Class, just click the New Class button. Following screenshot will appear. You will have to provide the following information as shown in the screenshot to create the new class.
View All Indexes
When you want to have an overview of all indexes created in your database, just click he all indexes button in the Schema UI. This will provide a quick access to some information about indexes (name, type, properties, etc.) and you can drop or rebuild them from here.
Edit Class
Click on any class on the schema section, you will get the following screenshot.
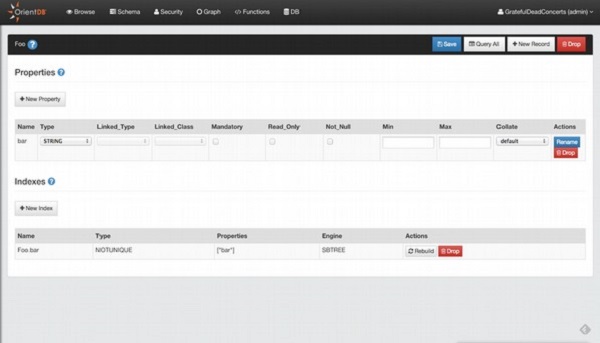
While editing a class, you can add a property or add a new index.
Add a Property
Click the New Property button to add property. You will get the following screenshot.
You have to provide the following details as shown in the screenshot to add property.

Add an Index
Click the New Index button. You will get the following screenshot. You have to provide the following details as shown in the screenshot to add an index.

Graph Editor
Click the graph section. Not only can you visualize your data in a graph style but you can also interact with the graph and modify it.
To populate the graph area, type a query in the query editor or use the functionality Send To Graph from the Browse UI.
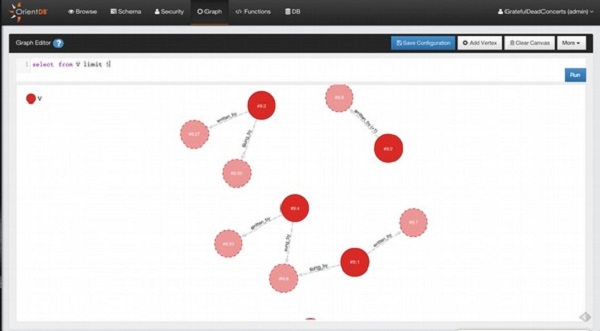
Add Vertices
To add a new Vertex in your Graph Database and in the Graph Canvas area, you have to press the button Add Vertex. This operation is done in two steps.
In the first step, you have to choose the class for the new Vertex and then click Next.

In the second step, you have to insert the field values of the new vertex. You can also add custom fields as OrientDB supports schema-less mode. To make the new vertex persistent, click ‘Save changes’ and the vertex will be saved into the database and added to the canvas area.
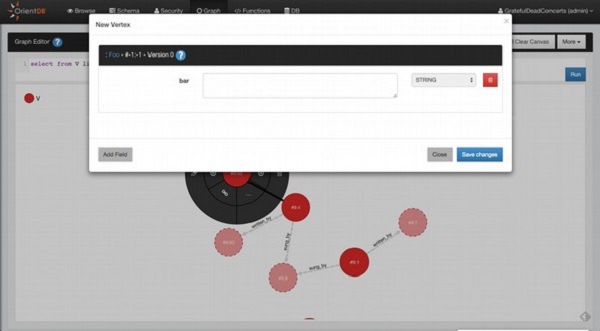
Delete Vertices
Open the circular menu by clicking on the Vertex that you want to delete. Open the submenu by hovering the mouse to the menu entry more (…) and then click the trash icon.
Remove Vertices from Canvas
Open the circular menu, open the sub-menu by hovering the mouse to the menu entry more (…) and then click the eraser icon.
Inspect Vertices
If you want to take a quick look to the Vertex property, click to the eye icon.
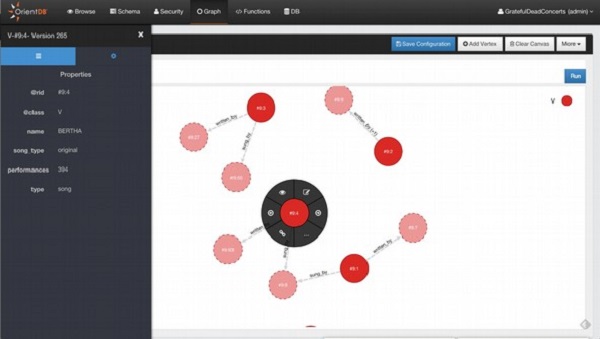
Security
Studio 2.0 includes the new Security Management, where you can manage Users and Roles in a graphical way.
Users
You can perform the following actions to manage the database users −
- Search Users
- Add Users
- Delete Users
- Edit User: roles can be edited in-line, for name, status and password click the Edit button
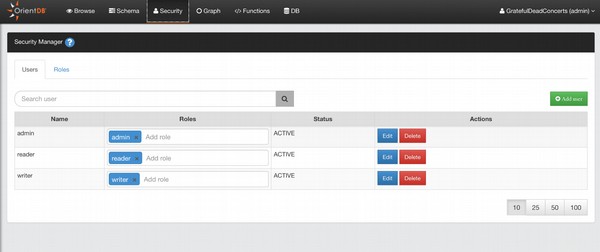
Add Users
To add a new User, click the Add User button, complete the information for the new user (name, password, status, roles) and then save to add the new user to the database.
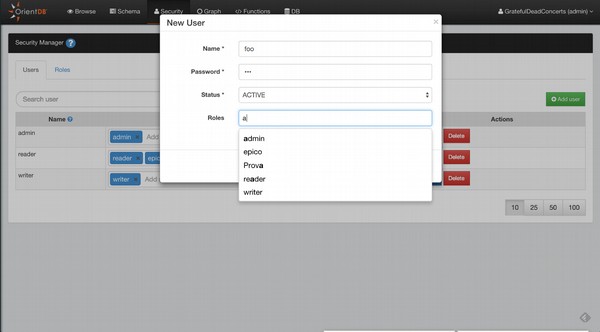
Roles
You can perform the following actions to manage the database roles −
- Search Role
- Add Role
- Delete Role
- Edit Role
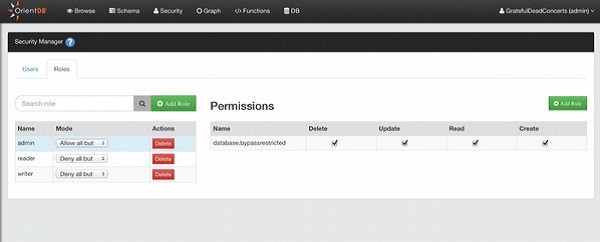
Add Role
To add a new User, click the Add Role button, complete the information for the new role (name, parent role, mode) and then save to add the new role to the database.
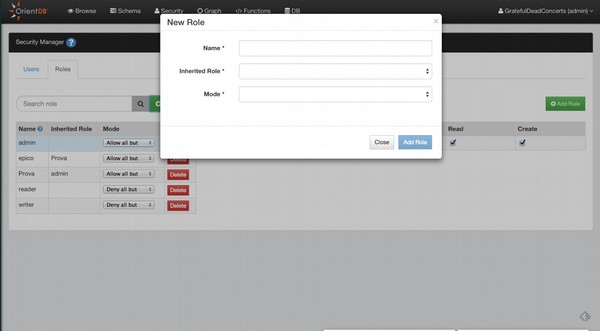
Add Rule to a Role
To add a new security rule for the selected role, click the Add Rule button. This will ask you the string of the resource that you want to secure. Then you can configure the CRUD permissions on the newly created resource.
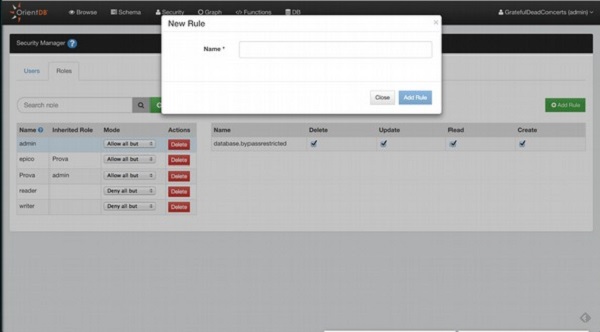
OrientDB – Java Interface
Similar to RDBMS, OrientDB supports JDBC. For this, first we need to configure the environment for JDBC programming. Following is the procedure to create a connection between your application and database.
First, we need to download the JDBC Driver. Visit the following link https://code.google.com/archive/p/orient/downloads to download OrientDB-JDBC.
Following are the basic five steps to achieve OrientDB-jdbc connectivity.
- Load JDBC driver
- Create Connection
- Create statement
- Execute statement
- Close connection
Example
Try the following example to understand OrientDB-JDBC connectivity. Let us consider we have an employee table which contains the following fields and its types.
| Sr.No. | Field Name | Type |
|---|---|---|
| 1 | Id | Integer |
| 2 | Name | String |
| 3 | Salary | Integer |
| 4 | Join date | Date |
You can create a Schema (table) by executing the following commands.
CREATE DATABASE PLOCAL:/opt/orientdb/databases/testdb
CREATE CLASS Employee
CREATE PROPERTY Customer.id integer
CREATE PROPERTY Customer.name String
CREATE PROPERTY Customer.salary integer
CREATE PROPERTY Customer.join_date date
After executing all the commands, you will get the Employee table with the following fields, employee name with id, age, and join_date fields.
Save the following code into OrientJdbcDemo.java file.
import com.orientechnologies.common.log.OLogManager;
import com.orientechnologies.orient.core.db.document.ODatabaseDocumentTx;
import org.junit.After;
import org.junit.Before;
import org.junit.BeforeClass;

import java.io.File;
import java.sql.DriverManager;
import java.util.Properties;

import static com.orientechnologies.orient.jdbc.OrientDbCreationHelper.createSchemaDB;
import static com.orientechnologies.orient.jdbc.OrientDbCreationHelper.loadDB;
import static java.lang.Class.forName;

public abstract class OrientJdbcDemo {

   protected OrientJdbcConnection conn;

   public static void main(String ar[]){

      //load Driver
      forName(OrientJdbcDriver.class.getName());
      String dbUrl = "memory:testdb";
      ODatabaseDocumentTx db = new ODatabaseDocumentTx(dbUrl);
      String username = "admin";
      String password = "admin";
      createSchemaDB(db);
      loadDB(db, 20);
      dbtx.create();

      //Create Connection
      Properties info = new Properties();
      info.put("user", username);
      info.put("password", password);
      conn = (OrientJdbcConnection) DriverManager.getConnection("jdbc:orient:" + dbUrl, info);

      //create and execute statement
      Statement stmt = conn.createStatement();
      int updated = stmt.executeUpdate("INSERT into emplyoee
         (intKey, text, salary, date) values ('001','satish','25000','"
         + date.toString() + "')");
      int updated = stmt.executeUpdate("INSERT into emplyoee
         (intKey, text, salary, date) values ('002','krishna','25000','"
         + date.toString() + "')");
      System.out.println("Records successfully inserted");

      //Close Connection
      if (conn != null && !conn.isClosed())
         conn.close();
   }
}
The following command is used to compile the above program.
$ javac –classpath:.:orientdb-jdbc-1.0-SNAPSHOT.jar OrientJdbcDemo.java
$ java –classpath:.:orientdb-jdbc-1.0-SNAPSHOT.jar OrientJdbcDemo
If the above command is executed successfully, you will get the following output.
Records Successfully Inserted
OrientDB – Python Interface
OrientDB driver for Python uses the binary protocol. PyOrient is the git hub project name which helps to connect OrientDB with Python. It works with OrientDB version 1.7 and later.
The following command is used to install PyOrient.
pip install pyorient
You can use the script file named demo.py to do the following tasks −
-
Create a client instance means create a connection.
-
Create DB named DB_Demo.
-
Open DB named DB_Demo.
-
Create class my_class.
-
Create properties id, and name.
-
Insert record into my class.
//create connection
client = pyorient.OrientDB("localhost", 2424)
session_id = client.connect( "admin", "admin" )
//create a databse
client.db_create( db_name, pyorient.DB_TYPE_GRAPH, pyorient.STORAGE_TYPE_MEMORY )
//open databse
client.db_open( DB_Demo, "admin", "admin" )
//create class
cluster_id = client.command( "create class my_class extends V" )
//create property
cluster_id = client.command( "create property my_class.id Integer" )
cluster_id = client.command( "create property my_class.name String" )
//insert record
client.command("insert into my_class ( 'id','’name' ) values( 1201, 'satish')")
Execute the above script using the following command.
$ python demo.py
Disclosure: We are a professional review site that receives compensation from the companies whose products we review. We are independently owned and we have spent time and effort doing our best to offer you the most relevant and accurate information. All the "customer reviews" are posted by real webmasters (hosting customers) and we're not responsable for their opinions. Purchasing any service from the hosting companies listed on our site is your solely decision.
Statistics Panel
| Stats Panel | Last 24h | Last Month | Total |
| Articles | 0 | 88 | 5166 |
| News | 0 | 597 | 18356 |
| Hosting Sites | 0 | 1 | 2452 |
| Reviews | 0 | 26 | 1807 |
| Coupons | 0 | 0 | 561 |